QESEM: A Qiskit Function by Qedma
Package versions
โค้ดในหน้านี้พัฒนาโดยใช้ requirements ต่อไปนี้ เราแนะนำให้ใช้เวอร์ชันเหล่านี้หรือใหม่กว่า
qiskit[all]~=2.5.0
qiskit-ibm-runtime~=0.47.0
Qiskit Functions เป็นฟีเจอร์ทดลองที่ใช้ได้เฉพาะผู้ใช้ IBM Quantum® Premium Plan, Flex Plan และ On-Prem (ผ่าน IBM Quantum Platform API) Plan เท่านั้น อยู่ในสถานะพรีวิวและอาจมีการเปลี่ยนแปลงได้
ภาพรวม
แม้ว่า quantum processing units จะพัฒนาขึ้นอย่างมากในช่วงไม่กี่ปีที่ผ่านมา แต่ error จาก noise และความไม่สมบูรณ์ของ hardware ที่มีอยู่ยังคงเป็นความท้าทายหลักสำหรับนักพัฒนา quantum algorithm เมื่อสาขานี้เข้าใกล้การคำนวณควอนตัมระดับ utility-scale ที่ไม่สามารถตรวจสอบได้ด้วยคอมพิวเตอร์คลาสสิก การแก้ปัญหาสำหรับการยกเลิก noise ที่มีการรับประกันความแม่นยำกลายเป็นสิ่งสำคัญมากขึ้นเรื่อยๆ เพื่อเอาชนะความท้าทายนี้ Qedma ได้พัฒนา Quantum Error Mitigation (QESEM) ที่ผสานรวมอย่างราบรื่นบน IBM Quantum Platform เป็น Qiskit Function
ด้วย QESEM ผู้ใช้สามารถรัน quantum circuits บน QPU ที่มี noise เพื่อรับผลลัพธ์ที่แม่นยำสูงและปราศจาก error พร้อม overhead ของเวลา QPU ที่มีประสิทธิภาพสูงมาก ใกล้เคียงกับขอบเขตพื้นฐาน เพื่อให้บรรลุเป้าหมายนี้ QESEM ใช้ชุดวิธีการเป็นกรรมสิทธิ์ที่ Qedma พัฒนาขึ้นสำหรับการระบุลักษณะและลด errors เทคนิคการลด error ได้แก่ gate optimization, noise-aware transpilation, error suppression (ES) และ unbiased error mitigation (EM) ด้วยการผสมผสานวิธีการที่อิงการระบุลักษณะเหล่านี้ ผู้ใช้สามารถได้ผลลัพธ์ที่เชื่อถือได้และปราศจาก error สำหรับ quantum circuits ปริมาณมากทั่วไป เปิดใช้งานแอปพลิเคชันที่ไม่สามารถทำได้อย่างอื่น
สำหรับคำอธิบายเต็มของ components พื้นฐานรวมถึงการสาธิตระดับ utility-scale ดูที่บทความ Reliable high-accuracy error mitigation for utility-scale quantum circuits.
คำอธิบาย
คุณสามารถใช้ฟังก์ชัน QESEM โดย Qedma เพื่อประเมินและรัน circuits ของคุณพร้อม error suppression และ mitigation ได้อย่างง่ายดาย ได้ circuit volumes ที่ใหญ่ขึ้นและความแม่นยำสูงขึ้น ในการใช้ QESEM คุณต้องให้ quantum circuit ชุด observables ที่จะวัด ความแม่นยำทางสถิติเป้าหมายสำหรับแต่ละ observable และ QPU ที่เลือก ก่อนรัน circuit ตามความแม่นยำเป้าหมาย คุณสามารถประเมินเวลา QPU ที่ต้องการโดยอิงการคำนวณเชิงวิเคราะห์ที่ไม่ต้องรัน circuit เมื่อพอใจกับการประเมินเวลา QPU แล้ว คุณก็สามารถรัน circuit ด้วย QESEM ได้
เมื่อคุณรัน circuit, QESEM จะรัน device characterization protocol ที่ปรับแต่งเฉพาะสำหรับ circuit ของคุณ ให้โมเดล noise ที่เชื่อถือได้สำหรับ error ที่เกิดขึ้นใน circuit จากการระบุลักษณะ QESEM จะ implement noise-aware transpilation ก่อน เพื่อ map input circuit ลงบน physical qubits และ gates ที่ลด noise ที่ส่งผลต่อ target observable ซึ่งรวมถึง gates ที่มีอยู่ native (CX/CZ บน IBM® devices) รวมถึง gates เพิ่มเติมที่ QESEM optimize ก่อตัวเป็น extended gate set ของ QESEM จากนั้น QESEM รันชุด ES และ EM circuits ที่อิงการระบุลักษณะบน QPU และเก็บผล measurement รูทีนเหล่านี้ถูก post-process แบบ classically เพื่อให้ค่า expectation value ที่ไม่มี bias และ error bar สำหรับแต่ละ observable ตามความแม่นยำที่ร้องขอ
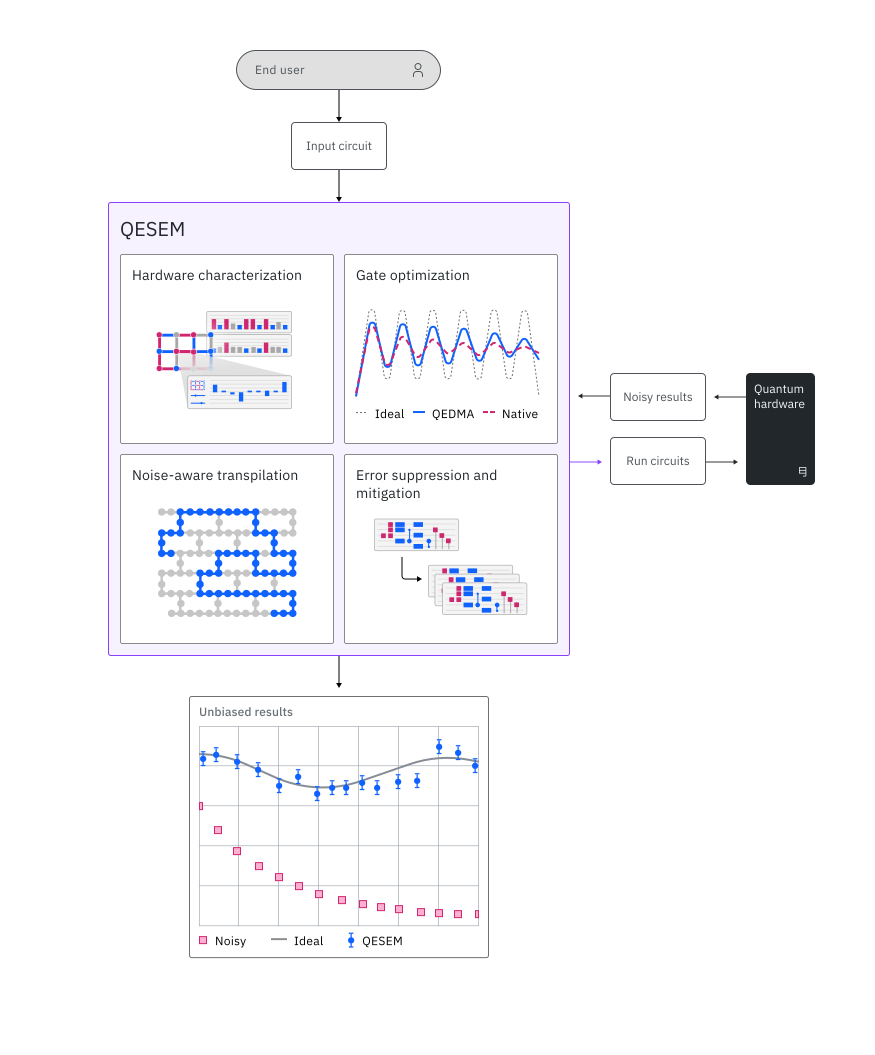 QESEM ได้รับการสาธิตว่าให้ผลลัพธ์ที่มีความแม่นยำสูงสำหรับ quantum applications หลากหลายรูปแบบและบน circuit volumes ที่ใหญ่ที่สุดที่ทำได้ในปัจจุบัน QESEM มีฟีเจอร์ต่อไปนี้ที่แสดงในส่วน benchmarks ด้านล่าง:
- ความแม่นยำที่รับประกัน: QESEM ให้ผลลัพธ์ประมาณค่า expectation values ของ observables ที่ไม่มี bias วิธี EM มีการรับประกันทางทฤษฎี ซึ่งร่วมกับการระบุลักษณะระดับ cutting-edge ของ Qedma รับประกันว่า mitigation จะ converge ไปสู่ noiseless circuit output ในระดับความแม่นยำที่ผู้ใช้กำหนด ต่างจากวิธี EM แบบ heuristic หลายวิธีที่เสี่ยงต่อ systematic errors หรือ biases ความแม่นยำที่รับประกันของ QESEM เป็นสิ่งสำคัญสำหรับให้ผลลัพธ์ที่เชื่อถือได้ใน quantum circuits และ observables ทั่วไป
- ขยายได้สำหรับ QPU ขนาดใหญ่: เวลา QPU ของ QESEM ขึ้นอยู่กับ circuit volumes แต่เป็นอิสระจากจำนวน Qubit Qedma ได้สาธิต QESEM บน quantum devices ที่ใหญ่ที่สุดที่มีอยู่ในปัจจุบัน รวมถึง IBM Quantum Eagle 127-qubit และ Heron 133-qubit devices
- ไม่เฉพาะเจาะจงกับแอปพลิเคชัน: QESEM ได้รับการสาธิตในแอปพลิเคชันหลากหลาย รวมถึง Hamiltonian simulation, VQE, QAOA และ amplitude estimation ผู้ใช้สามารถป้อน quantum circuit และ observable ใดๆ ที่ต้องการวัดและได้ผลลัพธ์ที่แม่นยำและปราศจาก error ข้อจำกัดเดียวถูกกำหนดโดย hardware specifications และเวลา QPU ที่จัดสรรไว้ ซึ่งกำหนด circuit volumes และความแม่นยำของ output ที่เข้าถึงได้ ต่างจากโซลูชันลด error หลายตัวที่เฉพาะเจาะจงกับแอปพลิเคชันหรือใช้ heuristics ที่ไม่ควบคุม ทำให้ใช้ไม่ได้กับ quantum circuits และแอปพลิเคชันทั่วไป
- Extended gate set: QESEM รองรับ fractional-angle gates และมี Qedma-optimized fractional-angle gates บน IBM Quantum Heron และ Eagle devices Extended gate set นี้ช่วยให้ compilation มีประสิทธิภาพมากขึ้นและเปิดล็อก circuit volumes ที่ใหญ่กว่าถึง 2 เท่าเมื่อเทียบกับ default CX/CZ compilation
- Multibase observables: QESEM รองรับ input observables ที่ประกอบด้วย Pauli strings ที่ไม่ commute กันหลายตัว เช่น generic Hamiltonians การเลือก measurement bases และการ optimize การจัดสรรทรัพยากร QPU (shots และ circuits) จะทำโดยอัตโนมัติโดย QESEM เพื่อลดเวลา QPU ที่ต้องการสำหรับความแม่นยำที่ร้องขอ การ optimize นี้ ซึ่งคำนึงถึง hardware fidelities และ execution rates ช่วยให้คุณรัน circuits ที่ลึกขึ้นและได้ความแม่นยำสูงขึ้น
Benchmarks
QESEM ได้รับการทดสอบกับ use cases และแอปพลิเคชันหลากหลาย ตัวอย่างต่อไปนี้ช่วยให้คุณประเมินได้ว่า workloads ประเภทใดที่คุณสามารถรันกับ QESEM ได้
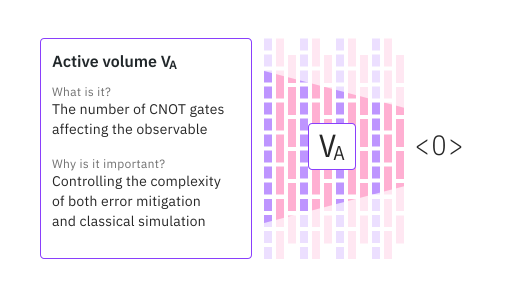
ตัวชี้วัดสำคัญสำหรับการวัดความยากของทั้ง error mitigation และ classical simulation สำหรับ circuit และ observable ที่กำหนดคือ active volume: จำนวน CNOT gates ที่ส่งผลต่อ observable ใน circuit active volume ขึ้นอยู่กับความลึกและความกว้างของ circuit, น้ำหนักของ observable และโครงสร้างของ circuit ซึ่งกำหนด light cone ของ observable สำหรับรายละเอียดเพิ่มเติม ดูการบรรยายจาก 2024 IBM Quantum Summit QESEM มีประโยชน์อย่างมากในระดับ high-volume โดยให้ผลลัพธ์ที่เชื่อถือได้สำหรับ circuits และ observables ทั่วไป
| แอปพลิเคชัน | จำนวน Qubit | Device | คำอธิบาย Circuit | ความแม่นยำ | เวลาทั้งหมด | การใช้งาน Runtime |
|---|---|---|---|---|---|---|
| VQE circuit | 8 | Eagle (r3) | 21 layers ทั้งหมด, 9 measurement bases, 1D chain | 98% | 35 นาที | 14 นาที |
| Kicked Ising | 28 | Eagle (r3) | 3 unique layers x 3 steps, 2D heavy-hex topology | 97% | 22 นาที | 4 นาที |
| Kicked Ising | 28 | Eagle (r3) | 3 unique layers x 8 steps, 2D heavy-hex topology | 97% | 116 นาที | 23 นาที |
| Trotterized Hamiltonian simulation | 40 | Eagle (r3) | 2 unique layers x 10 Trotter steps, 1D chain | 97% | 3 ชั่วโมง | 25 นาที |
| Trotterized Hamiltonian simulation | 119 | Eagle (r3) | 3 unique layers x 9 Trotter steps, 2D heavy-hex topology | 95% | 6.5 ชั่วโมง | 45 นาที |
| Kicked Ising | 136 | Heron (r2) | 3 unique layers x 15 steps, 2D heavy-hex topology | 99% | 52 นาที | 9 นาที |
ความแม่นยำวัดที่นี่เทียบกับค่า ideal ของ observable: โดยที่ '' คือความแม่นยำสัมบูรณ์ของ mitigation (กำหนดโดย user input) และ คือ observable บน noiseless circuit 'Runtime usage' วัดการใช้งาน benchmark ในโหมด batch (ผลรวมการใช้งานของแต่ละ job) ในขณะที่ 'total time' วัดการใช้งานในโหมด session (experiment wall time) ซึ่งรวมเวลา classical และ communication เพิ่มเติม QESEM พร้อมใช้งานในทั้งสองโหมด เพื่อให้ผู้ใช้ใช้ทรัพยากรที่มีอยู่ได้อย่างดีที่สุด
28-qubit Kicked Ising circuits จำลอง Discrete Time Quasicrystal ที่ศึกษาโดย Shinjo et al. (ดู arXiv 2403.16718 และ Q2B24 Tokyo) บน three connected loops ของ ibm_kawasaki พารามิเตอร์ circuit ที่ใช้คือ พร้อม ferromagnetic initial state observable ที่วัดคือค่าสัมบูรณ์ของ magnetization การทดลอง utility-scale Kicked Ising รันบน 136 qubits ที่ดีที่สุดของ ibm_fez benchmark เฉพาะนี้รันที่ Clifford angle ซึ่ง active volume โตช้าตาม circuit depth ซึ่งร่วมกับ device fidelities สูงทำให้ได้ความแม่นยำสูงใน runtime สั้น
Trotterized Hamiltonian simulation circuits สำหรับ Transverse-Field Ising model ที่ fractional angles: และ ตามลำดับ (ดู Q2B24 Tokyo) utility-scale circuit รันบน 119 qubits ที่ดีที่สุดของ ibm_brisbane ในขณะที่การทดลอง 40-qubit รันบน chain ที่ดีที่สุดที่มีอยู่ ความแม่นยำรายงานสำหรับ magnetization ผลลัพธ์ความแม่นยำสูงได้รับสำหรับ observables ที่มีน้ำหนักสูงกว่าด้วย
VQE circuit ถูกพัฒนาร่วมกับนักวิจัยจาก Center for Quantum Technology and Applications ที่ Deutsches Elektronen-Synchrotron (DESY) target observable ที่นี่คือ Hamiltonian ที่ประกอบด้วย Pauli strings ที่ไม่ commute กันจำนวนมาก เน้นประสิทธิภาพที่ optimize ของ QESEM สำหรับ multi-basis observables Mitigation ถูกนำไปใช้กับ classically-optimized ansatz แม้ว่าผลลัพธ์เหล่านี้ยังไม่ได้ตีพิมพ์ ผลลัพธ์คุณภาพเดียวกันจะได้รับสำหรับ circuits ต่างๆ ที่มีคุณสมบัติโครงสร้างคล้ายกัน
เริ่มต้นใช้งาน
Authenticate โดยใช้ IBM Quantum Platform API key และเลือก QESEM Qiskit Function ดังนี้ (snippet นี้สมมติว่าคุณได้ บันทึกบัญชีของคุณ ไว้ใน local environment แล้ว)
# Added by doQumentation — required packages for this notebook
!pip install -q qiskit qiskit-ibm-catalog qiskit-ibm-runtime
import qiskit
from qiskit_ibm_catalog import QiskitFunctionsCatalog

catalog = QiskitFunctionsCatalog(channel="ibm_quantum_platform")

# verify that you have access to the function
catalog.list()
# load the function
qesem_function = catalog.load("qedma/qesem")
ตัวอย่าง
ตัวอย่าง time estimation job
time estimation job มีประโยชน์สำหรับการประมาณเวลา QPU ที่ต้องการสำหรับ pub และ backend_name ที่กำหนด backend_name ยังสามารถตั้งเป็น simulator backend ใดๆ ก็ได้ เช่น fake_fez
QESEM ใช้วิธี EM แบบ quasi-probabilistic ที่อิงกับ characterization วิธีนี้มี QPU time overhead ที่ประมาณตามสูตรต่อไปนี้:
โดยที่ คือปริมาตรที่ใช้งาน (active volume) ของ circuit, คือความแม่นยำเป้าหมาย และ คือ infidelity ของ native gates
โปรดทราบว่า "estimate_time_only": "empirical" ใช้เวลา QPU สองสามนาทีเพื่อประมาณเวลาที่ต้องการสำหรับ job (หาก backend เป็นอุปกรณ์จริง; หากเป็น simulator จะไม่มีการใช้เวลา QPU) โดยปกติจะใช้เวลาประมาณ 5 นาที แต่ไม่เกิน 10 นาที หาก infidelity เปลี่ยนแปลงอย่างมากระหว่าง empirical time estimation job กับ mitigation job เวลา QPU ก็จะเปลี่ยนแปลงอย่างมากด้วยเช่นกัน
เพื่อเริ่มต้น ลองตัวอย่างพื้นฐานนี้ในการประเมินเวลา QPU ที่ต้องการในการรัน QESEM สำหรับ pub ที่กำหนด:
# This cell is hidden from users
from qiskit_ibm_runtime import QiskitRuntimeService

service = QiskitRuntimeService()
backend_name = service.least_busy().name
backend_name = "fake_fez"

circ = qiskit.QuantumCircuit(5)
circ.cx(0, 1)
circ.cx(2, 3)
circ.cx(1, 2)
circ.cx(3, 4)

avg_magnetization = qiskit.quantum_info.SparsePauliOp.from_sparse_list(
    [("Z", [q], 1 / 5) for q in range(5)], num_qubits=5
)
other_observable = qiskit.quantum_info.SparsePauliOp.from_sparse_list(
    [("ZZ", [0, 1], 1.0), ("XZ", [1, 4], 0.5)], num_qubits=5
)

time_estimation_job = qesem_function.run(
    pubs=[(circ, [avg_magnetization, other_observable])],
    options={
        "estimate_time_only": "empirical",
    },
    backend_name=backend_name,  # example: "fake_fez", "ibm_fez"
)
time_estimate_result = (
    time_estimation_job.result()
)  # a list of results per pub (circuit)
code snippet ต่อไปนี้อธิบายวิธีดึง execution metrics ต่างๆ จาก time estimation job (เมื่อตั้ง estimate_time_only):
pub_result = time_estimate_result[0]

print(
    f"The estimated QPU time for mitigation for this PUB is: {pub_result.metadata['time_estimation_sec']}"
)
print(
    f"The QPU time that this time estimation job took is (here it is 0 because we used fake_fez): {pub_result.metadata['total_qpu_time']}"
)
print(
    f"Gates fidelity measured during the experiment: {pub_result.metadata['gate_fidelities']}"
)
print(f"Total shots: {pub_result.metadata['total_shots']}")
print(f"Resource usage breakdown: {pub_result.metadata['resource_usage']}")
The estimated QPU time for mitigation for this PUB is: 300
The QPU time that this time estimation job took is (here it is 0 because we used fake_fez): 0
Gates fidelity measured during the experiment: {'CZ': 0.9951354916722668, 'ID1Q': 0.9991246627329172}
Total shots: 220000
Resource usage breakdown: {'RUNNING: MAPPING': {'CPU_TIME': 33.6066133165732, 'GPU_TIME': 0.0, 'QPU_TIME': 0.0}, 'RUNNING: OPTIMIZING_FOR_HARDWARE': {'CPU_TIME': 184.53575124032795, 'GPU_TIME': 0.0, 'QPU_TIME': 0.0}, 'RUNNING: WAITING_FOR_QPU': {'CPU_TIME': 0.0, 'GPU_TIME': 0.0, 'QPU_TIME': 0.0}, 'RUNNING: EXECUTING_QPU': {'CPU_TIME': 0.0, 'GPU_TIME': 0.0, 'QPU_TIME': 0.0}, 'RUNNING: POST_PROCESSING': {'CPU_TIME': 0.0, 'GPU_TIME': 0.0, 'QPU_TIME': 0.0}}
เมื่อเปิดใช้งาน empirical time estimation, QESEM จะรัน circuits จำนวนเล็กน้อยเพื่อให้การประมาณเวลา QPU แม่นยำขึ้น ผลลัพธ์ mitigation จาก circuits เหล่านี้อยู่ใน field empirical_estimation_mitigation_results ของ job
เนื่องจากผลลัพธ์เหล่านี้ได้มาจากตัวอย่าง circuits ที่จำกัด จึงมีความแม่นยำน้อยกว่าผลลัพธ์สุดท้ายที่ได้จาก QESEM mitigation job ที่สมบูรณ์อย่างมาก อย่างไรก็ตาม เมื่อ circuit มีขนาดเล็กหรือความแม่นยำเป้าหมายต่ำ mitigation ที่ทำระหว่าง empirical time estimation อาจเพียงพอที่จะบรรลุความแม่นยำที่ต้องการ และอาจไม่จำเป็นต้องใช้ full mitigation job
field empirical_estimation_mitigation_results เป็น list ของ PrimitiveResult objects ต่อ input parameter หนึ่งชุด หาก circuit ไม่ได้ถูก parametrize list จะมีความยาว 1
empirical_estimation_mitigation_results = time_estimate_result[0].metadata[
    "empirical_estimation_mitigation_results"
][0]  # a list per parameter
print("Partial results for the observables:")

print(
    f"    Mitigated expectation values: {empirical_estimation_mitigation_results.data.evs}"
)
print(
    f"    Mitigated error bars: {empirical_estimation_mitigation_results.data.stds}"
)
print(
    f"    Number of shots used for mitigation: {empirical_estimation_mitigation_results.metadata['mitigation_shots']}"
)
transpiled_circ = empirical_estimation_mitigation_results.metadata[
    "transpiled_circ"
]
print(f"    Qubit mapping: {transpiled_circ['qubit_maps']}")
print(
    f"    Number of measurement bases: {transpiled_circ['num_measurement_bases']}\n"
)

# results per obs
emp_obs_results = empirical_estimation_mitigation_results.metadata["results"][
    0
]
# print(f"Results for each observable: {results}")
print("Results for each observable:")

for i, (obs_array, result_dict) in enumerate(emp_obs_results):
    # obs_array, result_dict = results
    print(f"Observable {i+1}: {obs_array}")
    print(
        f"    QESEM mitigated value: {result_dict['qesem']['value']} \u00b1 {result_dict['qesem']['error_bar']}"
    )
Partial results for the observables:
    Mitigated expectation values: [1.00347302 1.00693905]
    Mitigated error bars: [0.00304061 0.00714276]
    Number of shots used for mitigation: 180000
    Qubit mapping: [[[0, 136], [1, 143], [2, 142], [3, 141], [4, 140]]]
    Number of measurement bases: 2

Results for each observable:
Observable 1: ObservablesArray({'IIIIZ': 0.2, 'IIIZI': 0.2, 'IIZII': 0.2, 'IZIII': 0.2, 'ZIIII': 0.2}, shape=())
    QESEM mitigated value: 1.003473015776871 ± 0.0030406128032204015
Observable 2: ObservablesArray({'IIIZZ': 1.0, 'ZIIXI': 0.5}, shape=())
    QESEM mitigated value: 1.0069390542613554 ± 0.0071427606736885925
ตัวอย่าง QESEM mitigation job
ตัวอย่างต่อไปนี้รัน QESEM job:
sample_job = qesem_function.run(
    pubs=[(circ, [avg_magnetization, other_observable])],
    backend_name=backend_name,  # example: "ibm_fez"
    # options = {
    #     "estimate_time_only": "empirical",
    #     "default_precision": 0.2,  # Default precision is applied to all pubs that don't have a precision specified, see API reference for more details
    #     "max_execution_time": 3600,  # You can specify a maximum QPU time in seconds, see API reference for more details
    #     "transpilation_level": "standard",  # "minimal_with_layout_opt" for minimal transpilation, see API reference for more details
    #     "parallel_execution": True,  # True for parallel execution, see API reference for more details
    # },
)
สำหรับคำอธิบายรายละเอียดของแต่ละ input field และตัวเลือก ดู เอกสารอ้างอิง API QESEM คุณสามารถใช้ Qiskit Serverless APIs ที่คุ้นเคยเพื่อตรวจสอบสถานะหรือดึงผลลัพธ์ของ Qiskit Function workload:
# Print the ID so you can use it later, if necessary
print(sample_job.job_id)
print(sample_job.status())
sample_result = sample_job.result()
3ac6b2df-15b0-4dc0-8f48-cf14bd20a1c8
DONE
code snippet ต่อไปนี้แสดงวิธีดึงผลลัพธ์ mitigation และ execution metrics ซึ่งประกอบด้วยข้อมูลสำคัญที่ช่วยให้เข้าใจได้ลึกขึ้นว่าพารามิเตอร์ต่างๆ ส่งผลต่อการรัน QESEM อย่างไร อาจมีความเกี่ยวข้องเมื่อเขียนบทความโดยอิงงานวิจัยของคุณด้วย
for pub_idx, pub_result in enumerate(
    sample_result
):  # each element in the list is a result for a different pub, here we sent only one pub
    print(f"\nPUB {pub_idx}:")
    print(
        f"  The QPU time that this job took is (here it is 0 because we used fake_fez): {pub_result.metadata['total_qpu_time']}"
    )
    print(
        f"  Gates fidelity measured during the experiment: {pub_result.metadata['gate_fidelities']}"
    )
    print(f"  Total shots: {pub_result.metadata['total_shots']}")
    print(
        f"  Number of shots used for mitigation: {pub_result.metadata['mitigation_shots']}"
    )
    print(
        f"  Resource usage breakdown: {pub_result.metadata['resource_usage']}"
    )
PUB 0:
  The QPU time that this job took is (here it is 0 because we used fake_fez): 0.0
  Gates fidelity measured during the experiment: {'CZ': 0.9953704216147041, 'ID1Q': 0.9991834123567518}
  Total shots: 446000
  Number of shots used for mitigation: 194000
  Resource usage breakdown: {'RUNNING: MAPPING': {'CPU_TIME': 32.52745003718883, 'GPU_TIME': 0.0, 'QPU_TIME': 0.0}, 'RUNNING: OPTIMIZING_FOR_HARDWARE': {'CPU_TIME': 257.850521848537, 'GPU_TIME': 0.0, 'QPU_TIME': 0.0}, 'RUNNING: WAITING_FOR_QPU': {'CPU_TIME': 0.0, 'GPU_TIME': 0.0, 'QPU_TIME': 0.0}, 'RUNNING: EXECUTING_QPU': {'CPU_TIME': 0.0, 'GPU_TIME': 0.0, 'QPU_TIME': 0.0}, 'RUNNING: POST_PROCESSING': {'CPU_TIME': 0.0, 'GPU_TIME': 0.0, 'QPU_TIME': 0.0}}
ใน metadata["results"] ผลลัพธ์จะถูกจัดกลุ่มก่อนตาม circuit instance และจากนั้นตาม observable
print("Full QESEM mitigation results:")

for pub_idx, pub_result in enumerate(sample_result):
    print(f"\nPUB {pub_idx}:")

    print(f"  Mitigated expectation values: {pub_result.data.evs}")
    print(f"  Mitigated error bars: {pub_result.data.stds}")
    noisy_results = pub_result.metadata.get("noisy_results")
    print(f"  Unmitigated expectation values: {noisy_results.evs}")
    print(f"  Unmitigated error bars: {noisy_results.stds}")

    print("  Transpiled circuits:")
    for circ_idx, transpiled_circ in enumerate(
        pub_result.metadata["transpiled_circs"]
    ):
        print(f"    Circuit {circ_idx}:")
        # print(f"      Circuit: \n {transpiled_circ['circuit']}") # not printing it because it's long but you can see the transpiled circuit itself
        print(f"      Qubit mapping: {transpiled_circ['qubit_maps']}")
        print(
            f"      Measurement bases: {transpiled_circ['num_measurement_bases']}"
        )

    print("  Results for each observable:")
    for circ_idx, circ_results in enumerate(pub_result.metadata["results"]):
        print(f"    Circuit {circ_idx}:")
        for obs_idx, (obs_array, result_dict) in enumerate(circ_results):
            print(f"      Observable {obs_idx}: {obs_array}")
            print(
                f"        QESEM mitigated value: {result_dict['qesem']['value']} ± {result_dict['qesem']['error_bar']}"
            )
            print(
                f"        Unmitigated value: {result_dict['unmitigated']['value']} ± {result_dict['unmitigated']['error_bar']}"
            )
Full QESEM mitigation results:

PUB 0:
  Mitigated expectation values: [1.00648343 1.00636289]
  Mitigated error bars: [0.00253812 0.00693586]
  Unmitigated expectation values: [0.98031429 0.96357143]
  Unmitigated error bars: [0.00124128 0.00578812]
  Transpiled circuits:
    Circuit 0:
      Qubit mapping: [[[0, 140], [1, 141], [2, 142], [3, 143], [4, 136]]]
      Measurement bases: 2
  Results for each observable:
    Circuit 0:
      Observable 0: ObservablesArray({'IIIIZ': 0.2, 'IIIZI': 0.2, 'IIZII': 0.2, 'IZIII': 0.2, 'ZIIII': 0.2}, shape=())
        QESEM mitigated value: 1.0064834305181962 ± 0.002538119914534849
        Unmitigated value: 0.9803142857142859 ± 0.0012412835813609938
      Observable 1: ObservablesArray({'IIIZZ': 1.0, 'ZIIXI': 0.5}, shape=())
        QESEM mitigated value: 1.0063628870614818 ± 0.006935859820870656
        Unmitigated value: 0.9635714285714285 ± 0.005788121870526659
สรุปผลลัพธ์หลัก:
mitigated: ค่า expectation value ของ QESEM ที่ผ่านการ mitigate อย่างสมบูรณ์unmitigated: ผลลัพธ์แบบ physical-noise ดิบโดยไม่มีการ mitigate error
ผลลัพธ์ QESEM heuristic extrapolation
ในการรัน QESEM มาตรฐานด้วยค่า precision แบบ float ตัวเดียว ผลลัพธ์ยังรวมถึงจุด noise-scaling ที่มีให้โดยอัตโนมัติซึ่งใช้สำหรับ QESEM heuristic จุดเหล่านี้คำนวณโดยไม่ใช้ทรัพยากร QPU เพิ่มเติม
Scale 1.0 แทนระดับ noise ของอุปกรณ์จริงพร้อม readout mitigation (REM) ในขณะที่ scale 2.0 คือจุด noise-amplified ที่เป็นส่วนเสริม ซึ่งมี REM เช่นกัน จุดเหล่านี้ใช้เพื่อสร้างผลลัพธ์ qesem_heuristic
-
qesem_heuristic: การประมาณค่าแบบ ZNE-style ที่คำนวณจากข้อมูล noise-scaled ที่มีให้ ปัจจุบันใช้ exponential extrapolation -
noise_scaling.results_with_REM: expectation values ที่ noise scale ต่างๆ ทั้งหมดมี readout mitigation (REM)
รายละเอียดที่ละเอียดอ่อนแต่สำคัญคือ ผลลัพธ์ที่ scale 1.0 ไม่เหมือนกับผลลัพธ์ unmitigated ทั้งสองสอดคล้องกับระดับ noise ของอุปกรณ์จริง แต่จุด scale 1.0 มี readout mitigation ในขณะที่ unmitigated ไม่มี
print("QESEM heuristic results:")

for pub_idx, pub_result in enumerate(sample_result):
    print(f"\nPUB {pub_idx}:")
    for circ_idx, circ_results in enumerate(pub_result.metadata["results"]):
        print(f"  Circuit {circ_idx}:")
        for obs_idx, (obs_array, result_dict) in enumerate(circ_results):
            print(f"    Observable {obs_idx}: {obs_array}")
            qesem_heuristic = result_dict["qesem_heuristic"][0]
            print("      QESEM heuristic:")
            print(
                f"        Value: {qesem_heuristic['value']} ± {qesem_heuristic['error_bar']}"
            )
            print(
                f"        Extrapolation: {qesem_heuristic['extrapolation']}"
            )
            print(
                f"        Scale factors: {qesem_heuristic['scale_factors']}"
            )
            noise_scaling = result_dict["noise_scaling"]
            print("      Noise scaling results:")
            print(
                f"        Scaling method: {noise_scaling['scaling_method']}"
            )
            print("        Results with Readout mitigation (REM):")
            for rem_result in sorted(
                (
                    item
                    for item in noise_scaling["results_with_REM"]
                    if item["scale"] != 0.0
                ),
                key=lambda item: item["scale"],
            ):
                print(
                    f"          Scale factor {rem_result['scale']}: {rem_result['value']} ± {rem_result['error_bar']}"
                )
QESEM heuristic results:

PUB 0:
  Circuit 0:
    Observable 0: ObservablesArray({'IIIIZ': 0.2, 'IIIZI': 0.2, 'IIZII': 0.2, 'IZIII': 0.2, 'ZIIII': 0.2}, shape=())
      QESEM heuristic:
        Value: 1.0008161638888535 ± 0.0038859458884403964
        Extrapolation: exponential
        Scale factors: [1.0, 2.0]
      Noise scaling results:
        Scaling method: QESEM
        Results with Readout mitigation (REM):
          Scale factor 1.0: 0.9918395459270772 ± 0.0012565417579355634
          Scale factor 2.0: 0.982943441922748 ± 0.0028919278067695018
    Observable 1: ObservablesArray({'IIIZZ': 1.0, 'ZIIXI': 0.5}, shape=())
      QESEM heuristic:
        Value: 0.9960853148925298 ± 0.013811635038961175
        Extrapolation: exponential
        Scale factors: [1.0, 2.0]
      Noise scaling results:
        Scaling method: QESEM
        Results with Readout mitigation (REM):
          Scale factor 1.0: 0.9902860583785115 ± 0.005921236914723409
          Scale factor 2.0: 0.984520565414274 ± 0.006909522262347639
ตัวอย่างต่อไปนี้เน้นที่ input และผลลัพธ์เฉพาะของแต่ละ feature ดังนั้นจึงไม่แสดง execution metric แบบเต็มทุกครั้ง metadata ระดับบนสุดที่แสดงไว้ก่อนหน้านี้ เช่น total_qpu_time, gate_fidelities, total_shots, mitigation_shots และ resource_usage ก็มีให้ใช้งานสำหรับ job เหล่านี้เช่นกัน
ตัวแปรบางส่วนจากตัวอย่างก่อนหน้านี้ รวมถึง backend, observables, และ base circuit parameters ถูกนำมาใช้ซ้ำด้านล่างเพื่อความกระชับ
ตัวอย่างต่อไปนี้ทั้งหมดสามารถรันด้วยการประมาณเวลาแบบ empirical ได้เช่นกัน หากต้องการเปิดใช้งาน ให้ส่ง "estimate_time_only": "empirical" ใน function options
ตัวอย่าง parameterized circuit
อัลกอริทึมหลายตัวประเมิน circuit เดียวกันที่ค่า parameter หลายค่า การส่ง parameterized circuit เป็น QESEM job เดียวช่วยให้ QESEM สามารถแบ่งปัน characterization และ calibration ระหว่าง circuit instances ซึ่งสามารถลด QPU-time overhead เมื่อเทียบกับการรัน job แยกกัน
การส่ง parameterized circuit ต้องใช้ transpilation level "minimal_with_layout_opt"
Circuits ที่ส่งที่ level นี้ควรถูกแสดงด้วย basis gates ของ backend อยู่แล้ว ขึ้นอยู่กับ backend ที่ level นี้ QESEM จะรักษาโครงสร้างที่ส่งมาให้ใกล้เคียงกับ input circuit มากที่สุด เคารพ barriers ระหว่าง layerification (การจัดกลุ่ม operations เป็น layers ของ two-qubit gates แบบขนาน) และยังจัดการ hardware mapping ไปยัง qubits ที่มี fidelity สูงและ device connectivity โดยอัตโนมัติ
ในทางปฏิบัติ นี่หมายความว่าคุณควร transpile circuits ไปยัง basis gates ของ target backend ก่อนส่ง ตัวอย่างง่ายๆ ของ basis-gate transpilation แสดงไว้ด้านล่าง
QESEM ปัจจุบันรองรับเพียง observable เดียวต่อ parameter set หนึ่งชุด แถว parameter สองแถวด้านล่างถูกจับคู่ (zipped) กับ observables สองตัว: แถวแรกวัดด้วย avg_magnetization และแถวที่สองวัดด้วย other_observable
# Transpile to the backend basis gates only. With minimal_with_layout_opt, QESEM handles hardware mapping/connectivity and observable layout internally.
from qiskit_ibm_runtime.fake_provider import FakeFez

backend = FakeFez()
basis = backend.operation_names
print(basis)

param0 = qiskit.circuit.Parameter("param0")
param1 = qiskit.circuit.Parameter("param1")
parametrized_circ = qiskit.QuantumCircuit(5)
parametrized_circ.rx(param0, 0)
parametrized_circ.rx(param1, 1)
parametrized_circ.cx(0, 1)
parametrized_circ.cx(2, 3)
parametrized_circ.cx(1, 2)
parametrized_circ.cx(3, 4)

parametrized_circ = qiskit.transpile(
    parametrized_circ, basis_gates=basis, optimization_level=1
)
parametrized_parameter_values = [[0.5, 0.1], [0.0, 0.6]]
parametrized_observables = [avg_magnetization, other_observable]

parametrized_job = qesem_function.run(
    pubs=[
        (
            parametrized_circ,
            parametrized_observables,
            parametrized_parameter_values,
            0.1,
        )
    ],
    backend_name=backend_name,
    options={
        "max_execution_time": 300,
        "transpilation_level": "minimal_with_layout_opt",
    },
)
print(parametrized_job.job_id)
print(parametrized_job.status())
d1b0e29b-196c-4896-aec6-44a268ebd874
DONE
parametrized_result = parametrized_job.result()
print("Parameterized circuit QESEM results:")

for pub_idx, pub_result in enumerate(parametrized_result):
    print(f"\nPUB {pub_idx}:")
    print(f"  Mitigated expectation values: {pub_result.data.evs}")
    print(f"  Mitigated error bars: {pub_result.data.stds}")
    noisy_results = pub_result.metadata["noisy_results"]
    print(f"  Unmitigated expectation values: {noisy_results.evs}")
    print(f"  Unmitigated error bars: {noisy_results.stds}")
    print("  Results for each parameter value:")
    for param_idx, param_results in enumerate(pub_result.metadata["results"]):
        print(
            f"    Parameter set {param_idx}: {parametrized_parameter_values[param_idx]}"
        )
        for obs_idx, (obs_array, result_dict) in enumerate(param_results):
            print(f"      Observable {obs_idx}: {obs_array}")
            print(
                f"        QESEM mitigated value: {result_dict['qesem']['value']} ± {result_dict['qesem']['error_bar']}"
            )
            print(
                f"        Unmitigated value: {result_dict['unmitigated']['value']} ± {result_dict['unmitigated']['error_bar']}"
            )
Parameterized circuit QESEM results:

PUB 0:
  Mitigated expectation values: [0.92392021 0.82517653]
  Mitigated error bars: [0.00565281 0.00616016]
  Unmitigated expectation values: [0.9028     0.78771429]
  Unmitigated error bars: [0.00335142 0.00925413]
  Results for each parameter value:
    Parameter set 0: [0.5, 0.1]
      Observable 0: ObservablesArray({'IIIIZ': 0.2, 'IIIZI': 0.2, 'IIZII': 0.2, 'IZIII': 0.2, 'ZIIII': 0.2}, shape=())
        QESEM mitigated value: 0.923920210615709 ± 0.005652811570890183
        Unmitigated value: 0.9028 ± 0.0033514176105045447
    Parameter set 1: [0.0, 0.6]
      Observable 0: ObservablesArray({'IIIZZ': 1.0, 'ZIIXI': 0.5}, shape=())
        QESEM mitigated value: 0.8251765289285893 ± 0.006160161743353999
        Unmitigated value: 0.7877142857142858 ± 0.009254130564027902
ตัวอย่าง Multi-pub
Multi-pub execution มีประโยชน์เมื่อคุณต้องการรัน circuits ที่เกี่ยวข้องกันหลายตัวใน QESEM job เดียว เช่นเดียวกับ parameterized execution สิ่งนี้สามารถลด overhead ได้เนื่องจาก QESEM สามารถแบ่งปัน characterization และ calibration ระหว่าง circuit instances แทนที่จะทำซ้ำใน job แยกกัน
สิ่งนี้มีประโยชน์อย่างยิ่งสำหรับ circuits ที่มีโครงสร้าง layer ร่วมกัน เช่น workloads แบบ Trotter-type ที่ circuits ต่างๆ ใช้ layers ที่ไม่ซ้ำกันร่วมกัน ในกรณีนั้น การรันพวกมันด้วยกันสามารถลดต้นทุน characterization เมื่อเทียบกับ QESEM job ที่เป็นอิสระต่อกัน
Multi-pub jobs ต้องการ "transpilation_level": "minimal_with_layout_opt" เช่นเดียวกับตัวอย่าง parameterized, circuits ควรถูก transpile ไปยัง basis gates ของ target backend ก่อนส่ง จากนั้น QESEM จะจัดการ device connectivity, layout, และ mapping ไปยัง qubits ที่มี fidelity สูงภายใน
แต่ละ PUB ด้านล่างมี circuit หนึ่งตัวและ observables สองตัวเดียวกับที่ใช้ก่อนหน้านี้ใน notebook ดังนั้น PrimitiveResult ที่ส่งคืนมาจะมี PubResult หนึ่งตัวต่อ input circuit หนึ่งตัว
ตัวอย่างด้านล่างใช้ Trotter circuits แบบง่ายสองตัวที่มีรูปแบบ layer เดียวกัน: circ_a มี Trotter layer หนึ่ง และ circ_b ทำซ้ำรูปแบบ layer เดียวกันสองครั้ง สิ่งนี้ทำให้โครงสร้างที่ใช้ร่วมกันชัดเจนขึ้น
def make_trotter_circuit(num_qubits, num_layers, zz_angle=0.2, x_angle=0.1):
    trotter_circ = qiskit.QuantumCircuit(num_qubits)
    for _ in range(num_layers):
        for q in range(num_qubits):
            trotter_circ.rx(x_angle, q)
        trotter_circ.barrier()
        for q in range(0, num_qubits - 1, 2):
            trotter_circ.rzz(zz_angle, q, q + 1)
        trotter_circ.barrier()
        for q in range(1, num_qubits - 1, 2):
            trotter_circ.rzz(zz_angle, q, q + 1)
        trotter_circ.barrier()
    return trotter_circ

circ_a = make_trotter_circuit(num_qubits=5, num_layers=1)
circ_b = make_trotter_circuit(num_qubits=5, num_layers=2)
multi_pubs = [
    (
        qiskit.transpile(qci, basis_gates=basis, optimization_level=1),
        [avg_magnetization, other_observable],
    )
    for qci in [circ_a, circ_b]
]

multi_circ_job = qesem_function.run(
    pubs=multi_pubs,
    backend_name=backend_name,
    options={
        "max_execution_time": 300,
        "transpilation_level": "minimal_with_layout_opt",
        "default_precision": 0.1,
    },
)
print(multi_circ_job.job_id)
print(multi_circ_job.status())
e34565b8-7262-4133-a120-de42ce624a99
DONE
multi_circ_result = multi_circ_job.result()
print("Multi-pub QESEM results:")

for pub_idx, pub_result in enumerate(multi_circ_result):
    print(f"\nPUB {pub_idx}:")
    print(f"  Mitigated expectation values: {pub_result.data.evs}")
    print(f"  Mitigated error bars: {pub_result.data.stds}")
    noisy_results = pub_result.metadata["noisy_results"]
    print(f"  Unmitigated expectation values: {noisy_results.evs}")
    print(f"  Unmitigated error bars: {noisy_results.stds}")
    print("  Results for each observable:")
    for circ_idx, circ_results in enumerate(pub_result.metadata["results"]):
        print(f"    Circuit {circ_idx}:")
        for obs_idx, (obs_array, result_dict) in enumerate(circ_results):
            print(f"      Observable {obs_idx}: {obs_array}")
            print(
                f"        QESEM mitigated value: {result_dict['qesem']['value']} ± {result_dict['qesem']['error_bar']}"
            )
            print(
                f"        Unmitigated value: {result_dict['unmitigated']['value']} ± {result_dict['unmitigated']['error_bar']}"
            )
Multi-pub QESEM results:

PUB 0:
  Mitigated expectation values: [0.99502406 1.02209332]
  Mitigated error bars: [0.00483819 0.00707488]
  Unmitigated expectation values: [0.96934286 0.97271429]
  Unmitigated error bars: [0.00124855 0.00617294]
  Results for each observable:
    Circuit 0:
      Observable 0: ObservablesArray({'IIIIZ': 0.2, 'IIIZI': 0.2, 'IIZII': 0.2, 'IZIII': 0.2, 'ZIIII': 0.2}, shape=())
        QESEM mitigated value: 0.9950240647925642 ± 0.004838188086259301
        Unmitigated value: 0.9693428571428573 ± 0.0012485470362492692
      Observable 1: ObservablesArray({'IIIZZ': 1.0, 'ZIIXI': 0.5}, shape=())
        QESEM mitigated value: 1.0220933230604674 ± 0.007074884384355636
        Unmitigated value: 0.9727142857142859 ± 0.006172939375512439

PUB 1:
  Mitigated expectation values: [0.98850017 1.02555188]
  Mitigated error bars: [0.0077912  0.01672652]
  Unmitigated expectation values: [0.93682857 0.95371429]
  Unmitigated error bars: [0.00156245 0.00665735]
  Results for each observable:
    Circuit 0:
      Observable 0: ObservablesArray({'IIIIZ': 0.2, 'IIIZI': 0.2, 'IIZII': 0.2, 'IZIII': 0.2, 'ZIIII': 0.2}, shape=())
        QESEM mitigated value: 0.988500171577252 ± 0.007791203181151346
        Unmitigated value: 0.9368285714285716 ± 0.001562451883089579
      Observable 1: ObservablesArray({'IIIZZ': 1.0, 'ZIIXI': 0.5}, shape=())
        QESEM mitigated value: 1.02555188098689 ± 0.016726524388086233
        Unmitigated value: 0.9537142857142858 ± 0.006657345655544263
ตัวอย่าง Quasi-probabilistic Error Tuning (QET)
Quasi-probabilistic Error Tuning (QET) ขอ expectation values ที่ noise scale factors ที่เลือก สิ่งนี้มีประโยชน์สำหรับการศึกษา noise-scaling แบบกำหนดเองและ workflow ของ Zero-Noise Extrapolation Scale 1.0 คือระดับ noise ทางกายภาพ ค่าระหว่าง 0.0 ถึง 1.0 ลด noise บางส่วน และค่าที่มากกว่า 1.0 ขยาย noise
หากต้องการใช้ QET กับ Qiskit Function ให้ส่ง dictionary เป็น PUB precision dictionary จะแมป noise scale ที่ขอแต่ละตัวไปยังความแม่นยำเป้าหมาย ผลลัพธ์ scale-factor ที่ส่งคืนจะถูกเก็บไว้ใน noise_scaling.results_with_REM และรวม readout mitigation ด้วย ดังนั้นจุด scale 1.0 จึงไม่เหมือนกับค่า unmitigated เพราะ 1.0 มี readout mitigation ในขณะที่ unmitigated ไม่มี
เมื่อมีการขอ scale หนึ่ง QESEM ยังส่งคืน scale ที่เป็นส่วนเสริมรอบๆ 1.0 โดยไม่ใช้ QPU เพิ่มเติม ตัวอย่างเช่น การขอ 0.5 ยังสามารถส่งคืน 1.5 และการขอ 1.3 ยังสามารถส่งคืน 0.7 ความแม่นยำที่ scale ส่วนเสริมนั้นไม่ได้รับการรับประกัน
noise_scale_precision = {0.5: 0.15, 1.3: 0.2}

qet_job = qesem_function.run(
    pubs=[
        (
            circ,
            [avg_magnetization, other_observable],
            None,
            noise_scale_precision,
        )
    ],
    backend_name=backend_name,
    options={"max_execution_time": 300},
)
print(qet_job.job_id)
print(qet_job.status())
8195fa58-f037-4651-8715-36ce1cdc5521
DONE
qet_result = qet_job.result()
print("QET noise-scaling results:")

for pub_idx, pub_result in enumerate(qet_result):
    print(f"\nPUB {pub_idx}:")
    noisy_results = pub_result.metadata["noisy_results"]
    print(f"  Unmitigated expectation values: {noisy_results.evs}")
    print(f"  Unmitigated error bars: {noisy_results.stds}")
    print("  Results for each observable:")
    for circ_idx, circ_results in enumerate(pub_result.metadata["results"]):
        print(f"    Circuit {circ_idx}:")
        for obs_idx, (obs_array, result_dict) in enumerate(circ_results):
            print(f"      Observable {obs_idx}: {obs_array}")
            noise_scaling = result_dict["noise_scaling"]
            print(
                f"        Scaling method: {noise_scaling['scaling_method']}"
            )
            print("        Results with Readout mitigation (REM):")
            for rem_result in sorted(
                (
                    item
                    for item in noise_scaling["results_with_REM"]
                    if item["scale"] != 0.0
                ),
                key=lambda item: item["scale"],
            ):
                print(
                    f"          Scale factor {rem_result['scale']}: {rem_result['value']} ± {rem_result['error_bar']}"
                )
QET noise-scaling results:

PUB 0:
  Unmitigated expectation values: [0.97822857 0.96171429]
  Unmitigated error bars: [0.00123812 0.00672958]
  Results for each observable:
    Circuit 0:
      Observable 0: ObservablesArray({'IIIIZ': 0.2, 'IIIZI': 0.2, 'IIZII': 0.2, 'IZIII': 0.2, 'ZIIII': 0.2}, shape=())
        Scaling method: QESEM
        Results with Readout mitigation (REM):
          Scale factor 0.5: 0.9938730340199383 ± 0.0032116907357568275
          Scale factor 0.7: 0.9963976191853445 ± 0.00036300258869586616
          Scale factor 1.0: 0.9898115079506586 ± 0.0012525947426560995
          Scale factor 1.3: 0.9864667065580341 ± 0.002633221613518526
          Scale factor 1.5: 0.9838755527197551 ± 0.002948417797996015
      Observable 1: ObservablesArray({'IIIZZ': 1.0, 'ZIIXI': 0.5}, shape=())
        Scaling method: QESEM
        Results with Readout mitigation (REM):
          Scale factor 0.5: 1.0006538544450332 ± 0.002121742014777343
          Scale factor 0.7: 1.0004159801523036 ± 0.0021671375357823794
          Scale factor 1.0: 0.9898058846339917 ± 0.00690183710903159
          Scale factor 1.3: 0.9948946719997267 ± 0.002146532859610311
          Scale factor 1.5: 0.9927220368192772 ± 0.0020875057190323882
ดึงข้อความ error
หาก workload status ของคุณเป็น ERROR ให้ใช้ job.result() เพื่อดึงข้อความ error ดังนี้:
# Get the result and truncate for readability
result = sample_job.result()
result_str = str(result)
max_length = 500  # Adjust this value as necessary

if len(result_str) > max_length:
    truncated = (
        result_str[:max_length]
        + f"... (truncated {len(result_str) - max_length} characters)"
    )
else:
    truncated = result_str

print(truncated)
PrimitiveResult([PubResult(data=DataBin(evs=np.ndarray(<shape=(2,), dtype=float64>), stds=np.ndarray(<shape=(2,), dtype=float64>), shape=(2,)), metadata={'gate_fidelities': {'CZ': 0.9979444718552628, 'ID1Q': 0.9991994239814883}, 'total_shots': 498600, 'mitigation_shots': 223400, 'transpiled_circs': [{'circuit': 'OPENQASM 3.0;\ninclude "stdgates.inc";\nbit[76] c0;\nqubit[76] q0;\nrx(0) q0[54];\nrx(0) q0[59];\nrx(0) q0[75];\nrz(pi/2) q0[54];\nrz(pi/2) q0[59];\nrz(pi/2) q0[75];\nrx(pi/2) q0[54];\nr... (truncated 3771 characters)
ขอความช่วยเหลือ
ทีม support ของ Qedma พร้อมช่วยเหลือ หากเจอปัญหาหรือมีคำถามเกี่ยวกับการใช้ QESEM Qiskit Function โปรดอย่าลังเลที่จะติดต่อ เจ้าหน้าที่ support ที่มีความรู้และเป็นมิตรพร้อมช่วยเหลือกับข้อกังวลทางเทคนิคหรือคำถามที่คุณอาจมี
ส่ง email มาที่ support@qedma.com เพื่อขอความช่วยเหลือ โปรดรวมรายละเอียดให้มากที่สุดเท่าที่เป็นไปได้เกี่ยวกับปัญหาที่คุณประสบเพื่อช่วยให้เราตอบสนองได้รวดเร็วและแม่นยำ คุณยังติดต่อตัวแทน Qedma POC ที่ดูแลของคุณทาง email หรือโทรศัพท์ได้ด้วย
เพื่อช่วยให้เราช่วยเหลือได้มีประสิทธิภาพมากขึ้น โปรดให้ข้อมูลต่อไปนี้เมื่อติดต่อ:
-
คำอธิบายโดยละเอียดของปัญหา
-
Job ID
-
ข้อความ error หรือ codes ที่เกี่ยวข้อง
เรามุ่งมั่นให้ support ที่รวดเร็วและมีประสิทธิภาพเพื่อให้แน่ใจว่าคุณจะมีประสบการณ์ที่ดีที่สุดกับ Qiskit Function ของเรา
เรามองหาวิธีปรับปรุงผลิตภัณฑ์อยู่เสมอและยินดีรับข้อเสนอแนะของคุณ หากมีแนวคิดว่าเราจะปรับปรุงบริการหรือฟีเจอร์ที่ต้องการเห็นได้อย่างไร โปรดส่งความคิดของคุณมาที่ support@qedma.com
ขั้นตอนถัดไป
-
เยี่ยมชม API reference สำหรับ Qiskit Function นี้
-
ลอง tutorial Simulate 2D tilted-field Ising with the QESEM function