Classical feedforward และ control flow (dynamic circuits)
เวอร์ชันของแพ็กเกจ
โค้ดในหน้านี้พัฒนาโดยใช้ข้อกำหนดดังต่อไปนี้ แนะนำให้ใช้เวอร์ชันเหล่านี้หรือใหม่กว่า
qiskit[all]~=2.5.2
Dynamic circuits เป็นเครื่องมือที่ทรงพลัง ซึ่งช่วยให้วัดค่า Qubit ได้ในระหว่างการรัน quantum circuit และจากนั้นดำเนินการ classical logic ภายใน Circuit โดยอิงจากผลของการวัดกลางวงจร (mid-circuit measurements) กระบวนการนี้เรียกอีกอย่างว่า classical feedforward แม้ยังเป็นช่วงต้นของการเข้าใจวิธีใช้ประโยชน์จาก dynamic circuits ได้ดีที่สุด แต่ชุมชนวิจัยควอนตัมก็ระบุกรณีการใช้งานหลายอย่างไว้แล้ว เช่น:
-
การเตรียมสถานะควอนตัมอย่างมีประสิทธิภาพ เช่น GHZ state, W-state (สำหรับข้อมูลเพิ่มเติมเกี่ยวกับ W-state สามารถดูได้ที่ "State preparation by shallow circuits using feed forward") และกลุ่มที่กว้างขวางของ matrix product states
-
การพัวพันระยะไกลอย่างมีประสิทธิภาพ ระหว่าง Qubit บนชิปเดียวกันโดยใช้ Circuit ตื้น
-
การสุ่มตัวอย่าง Circuit แบบ IQP อย่างมีประสิทธิภาพ Qiskit รองรับโครงสร้าง control flow 4 แบบสำหรับ classical feedforward ซึ่งแต่ละแบบเป็นเมธอดของ
QuantumCircuitโครงสร้างเหล่านี้และเมธอดที่สอดคล้องกันมีดังนี้:
-
If statement -
QuantumCircuit.if_test -
Switch statement -
QuantumCircuit.switch -
For loop -
QuantumCircuit.for_loop -
While loop -
QuantumCircuit.while_loop
เมธอดเหล่านี้แต่ละตัวจะคืนค่าเป็น context manager และมักใช้ใน with statement ส่วนที่เหลือของคู่มือนี้จะอธิบายโครงสร้างแต่ละแบบและวิธีใช้งาน
มีข้อจำกัดบางประการของ classical feedforward และ control flow operations บนฮาร์ดแวร์ควอนตัมที่อาจส่งผลต่อโปรแกรมของคุณ สำหรับข้อมูลเพิ่มเติม ดูที่ Execute dynamic circuits
คำสั่ง if
คำสั่ง if ใช้เพื่อดำเนินการตามเงื่อนไขโดยอิงจากค่าของ classical bit หรือ register
ในตัวอย่างด้านล่าง เราจะใส่ Hadamard Gate ให้กับ Qubit แล้ววัดค่า ถ้าผลลัพธ์เป็น 1 เราจะใส่ X Gate บน Qubit ซึ่งมีผลพลิกกลับไปที่สถานะ 0 จากนั้นเราวัด Qubit อีกครั้ง ผลการวัดสุดท้ายควรเป็น 0 ด้วยความน่าจะเป็น 100%
# Added by doQumentation — installs the packages this notebook needs if they are missing
import importlib.util

_needed = {"qiskit": "qiskit"}
_missing = [pip for module, pip in _needed.items()
            if importlib.util.find_spec(module) is None]
# One at a time, so a package that fails to install does not block the others
for _pip in _missing:
    %pip install -q {_pip}
if not _missing:
    print("\u2713 All required packages are installed")
from qiskit.circuit import QuantumCircuit, QuantumRegister, ClassicalRegister

qubits = QuantumRegister(1)
clbits = ClassicalRegister(1)
circuit = QuantumCircuit(qubits, clbits)
(q0,) = qubits
(c0,) = clbits

circuit.h(q0)
circuit.measure(q0, c0)
with circuit.if_test((c0, 1)):
    circuit.x(q0)
circuit.measure(q0, c0)
circuit.draw("mpl")

# example output counts: {'0': 1024}

คำสั่ง with สามารถกำหนด assignment target ซึ่งเป็น context manager ที่สามารถเก็บไว้และนำไปใช้สร้าง else block ได้ โดย else block จะถูกรันเมื่อเนื้อหาใน if block ไม่ถูกรัน
ในตัวอย่างด้านล่าง เราจะกำหนด register ที่มี Qubit สองตัวและ classical bit สองบิต เราใส่ Hadamard Gate ให้กับ Qubit ตัวแรกแล้ววัดค่า ถ้าผลลัพธ์เป็น 1 เราจะใส่ Hadamard Gate บน Qubit ตัวที่สอง มิเช่นนั้น เราจะใส่ X Gate บน Qubit ตัวที่สอง สุดท้ายเราวัด Qubit ตัวที่สองด้วย
qubits = QuantumRegister(2)
clbits = ClassicalRegister(2)
circuit = QuantumCircuit(qubits, clbits)
(q0, q1) = qubits
(c0, c1) = clbits

circuit.h(q0)
circuit.measure(q0, c0)
with circuit.if_test((c0, 1)) as else_:
    circuit.h(q1)
with else_:
    circuit.x(q1)
circuit.measure(q1, c1)

circuit.draw("mpl")

# example output counts: {'01': 260, '11': 272, '10': 492}
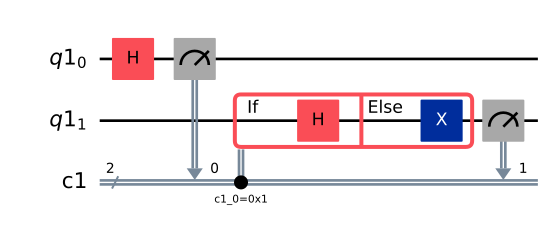
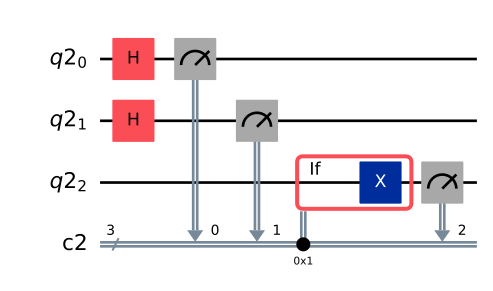
นอกจากการกำหนดเงื่อนไขบน classical bit เดียวแล้ว ยังสามารถกำหนดเงื่อนไขบนค่าของ classical register ที่ประกอบด้วยหลายบิตได้
ในตัวอย่างด้านล่าง เราใส่ Hadamard Gate ให้กับ Qubit สองตัวแล้ววัดค่า ถ้าผลลัพธ์เป็น 01 หมายถึง Qubit ตัวแรกเป็น 1 และ Qubit ตัวที่สองเป็น 0 เราจะใส่ X Gate ให้กับ Qubit ตัวที่สาม สุดท้ายเราวัด Qubit ตัวที่สาม โปรดสังเกตว่าเพื่อความชัดเจน เราเลือกระบุสถานะของ classical bit ตัวที่สาม ซึ่งเป็น 0 ไว้ในเงื่อนไข if ด้วย ในการวาด Circuit เงื่อนไขแสดงด้วยวงกลมบน classical bit ที่ถูกกำหนดเงื่อนไข วงกลมทึบหมายถึงเงื่อนไขบน 1 ส่วนวงกลมขอบโปร่งหมายถึงเงื่อนไขบน 0
qubits = QuantumRegister(3)
clbits = ClassicalRegister(3)
circuit = QuantumCircuit(qubits, clbits)
(q0, q1, q2) = qubits
(c0, c1, c2) = clbits

circuit.h([q0, q1])
circuit.measure(q0, c0)
circuit.measure(q1, c1)
with circuit.if_test((clbits, 0b001)):
    circuit.x(q2)
circuit.measure(q2, c2)

circuit.draw("mpl")

# example output counts: {'101': 269, '011': 260, '000': 252, '010': 243}
คำสั่ง switch
Switch statement ใช้เพื่อเลือกการดำเนินการตามค่าของ classical bit หรือ register คล้ายกับ if statement แต่คุณสามารถระบุหลาย case สำหรับ branching logic ได้ ตัวอย่างด้านล่างใส่ Hadamard Gate ให้กับ Qubit แล้ววัดค่า ถ้าผลลัพธ์เป็น 0 ให้ใส่ X Gate บน Qubit และถ้าผลลัพธ์เป็น 1 ให้ใส่ Z Gate ผลการวัดสุดท้ายควรเป็น 1 ด้วยความน่าจะเป็น 100%
qubits = QuantumRegister(1)
clbits = ClassicalRegister(1)
circuit = QuantumCircuit(qubits, clbits)
(q0,) = qubits
(c0,) = clbits

circuit.h(q0)
circuit.measure(q0, c0)
with circuit.switch(c0) as case:
    with case(0):
        circuit.x(q0)
    with case(1):
        circuit.z(q0)
circuit.measure(q0, c0)

circuit.draw("mpl")

# example output counts: {'1': 1024}
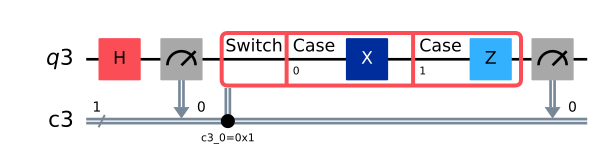
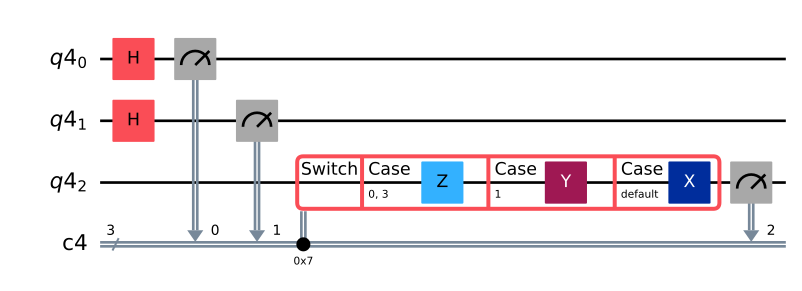
เนื่องจากตัวอย่างด้านบนใช้ classical bit เดียว จึงมีแค่สอง case ที่เป็นไปได้ ดังนั้นผลลัพธ์เดียวกันสามารถทำได้ด้วย if-else statement Switch case มีประโยชน์เป็นหลักเมื่อต้องแตกแขนงตามค่าของ classical register ที่ประกอบด้วยหลายบิต ตัวอย่างต่อไปนี้แสดงวิธีสร้าง default case ซึ่งจะรันเมื่อไม่มี case ก่อนหน้าตรงกัน โปรดสังเกตว่าใน switch statement จะมีเพียง block เดียวที่รัน ไม่มี fallthrough
ตัวอย่างด้านล่างใส่ Hadamard Gate ให้กับ Qubit สองตัวแล้ววัดค่า ถ้าผลลัพธ์เป็น 00 หรือ 11 ให้ใส่ Z Gate ให้กับ Qubit ตัวที่สาม ถ้าผลลัพธ์เป็น 01 ให้ใส่ Y Gate ถ้าไม่มี case ก่อนหน้าตรงกัน ให้ใส่ X Gate สุดท้ายวัด Qubit ตัวที่สาม
qubits = QuantumRegister(3)
clbits = ClassicalRegister(3)
circuit = QuantumCircuit(qubits, clbits)
(q0, q1, q2) = qubits
(c0, c1, c2) = clbits

circuit.h([q0, q1])
circuit.measure(q0, c0)
circuit.measure(q1, c1)
with circuit.switch(clbits) as case:
    with case(0b000, 0b011):
        circuit.z(q2)
    with case(0b001):
        circuit.y(q2)
    with case(case.DEFAULT):
        circuit.x(q2)
circuit.measure(q2, c2)

circuit.draw("mpl")

# example output counts: {'101': 267, '110': 249, '011': 265, '000': 243}
ลูป for
For loop ใช้เพื่อวนซ้ำค่า classical ตามลำดับและดำเนินการบางอย่างในแต่ละรอบ
ตัวอย่างต่อไปนี้ใช้ for loop เพื่อใส่ X Gate 5 ครั้งให้กับ Qubit แล้ววัดค่า เนื่องจากใส่ X Gate จำนวนคี่ครั้ง ผลรวมคือการพลิก Qubit จากสถานะ 0 ไปเป็นสถานะ 1
qubits = QuantumRegister(1)
clbits = ClassicalRegister(1)
circuit = QuantumCircuit(qubits, clbits)
(q0,) = qubits
(c0,) = clbits

with circuit.for_loop(range(5)) as _:
    circuit.x(q0)
circuit.measure(q0, c0)

circuit.draw("mpl")

# example output counts: {'1': 1024}

ลูป while
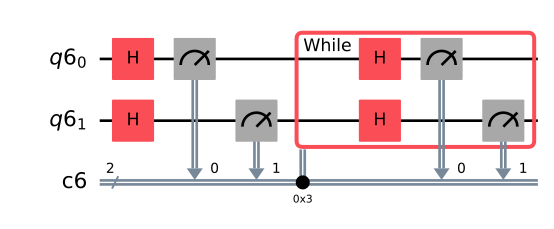
While loop ใช้เพื่อทำซ้ำคำสั่งในขณะที่เงื่อนไขบางอย่างยังเป็นจริง
ตัวอย่างด้านล่างใส่ Hadamard Gate ให้กับ Qubit สองตัวแล้ววัดค่า จากนั้นสร้าง while loop ที่ทำซ้ำขั้นตอนนี้ในขณะที่ผลการวัดเป็น 11 ผลลัพธ์คือผลการวัดสุดท้ายจะไม่เป็น 11 โดยที่ความเป็นไปได้ที่เหลือปรากฏด้วยความถี่ใกล้เคียงกัน
qubits = QuantumRegister(2)
clbits = ClassicalRegister(2)
circuit = QuantumCircuit(qubits, clbits)

q0, q1 = qubits
c0, c1 = clbits

circuit.h([q0, q1])
circuit.measure(q0, c0)
circuit.measure(q1, c1)
with circuit.while_loop((clbits, 0b11)):
    circuit.h([q0, q1])
    circuit.measure(q0, c0)
    circuit.measure(q1, c1)

circuit.draw("mpl")

# example output counts: {'01': 334, '10': 368, '00': 322}
นิพจน์แบบคลาสสิก
โมดูล classical expression ของ Qiskit qiskit.circuit.classical ประกอบด้วยรูปแบบการแทนเชิงทดลองของการดำเนินการ runtime บนค่า classical ระหว่างการรัน Circuit
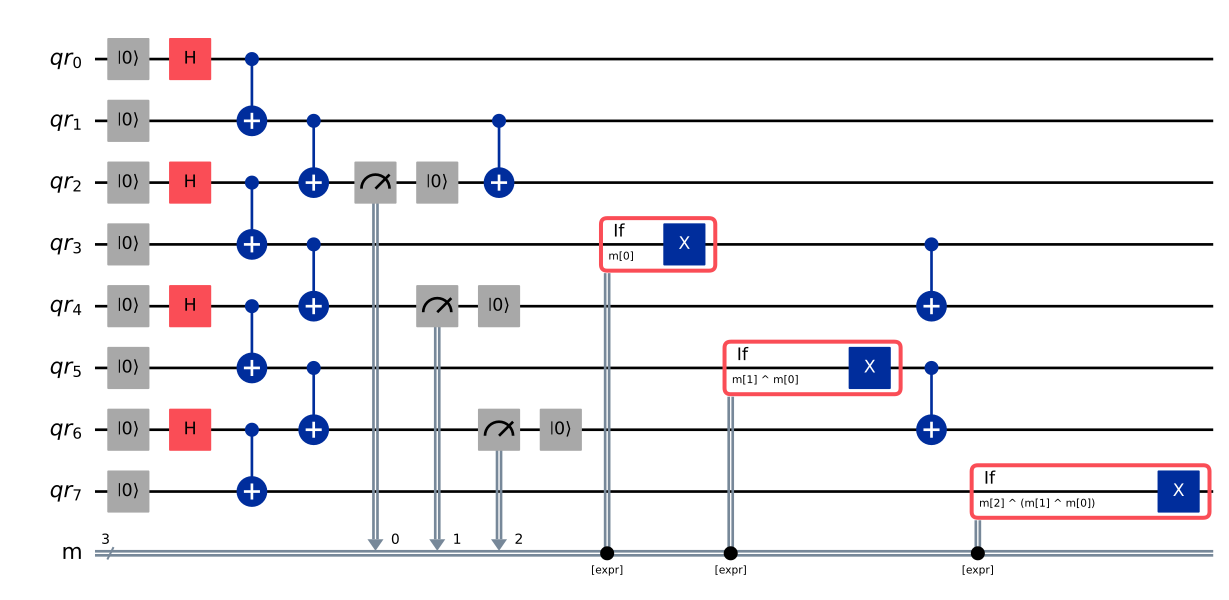
ตัวอย่างต่อไปนี้แสดงว่าสามารถใช้การคำนวณ parity เพื่อสร้าง n-qubit GHZ state โดยใช้ dynamic circuits ได้ อันดับแรก สร้าง Bell pairs บน Qubit ที่อยู่ติดกัน จากนั้น เชื่อมต่อคู่เหล่านี้โดยใช้ layer ของ CNOT gates ระหว่างคู่ จากนั้นวัด target Qubit ของ CNOT gates ทั้งหมดก่อนหน้าและ reset แต่ละ Qubit ที่วัดแล้วให้กลับเป็นสถานะ ใส่ ให้กับทุก site ที่ไม่ถูกวัดซึ่ง parity ของบิตก่อนหน้าทั้งหมดเป็นเลขคี่ สุดท้าย ใส่ CNOT gates ให้กับ Qubit ที่ถูกวัดเพื่อสร้าง entanglement ที่สูญเสียไปจากการวัดขึ้นใหม่
ในการคำนวณ parity องค์ประกอบแรกของนิพจน์ที่สร้างขึ้นเกี่ยวข้องกับการยก Python object mr[0] ขึ้นเป็น node Value (lift ใช้แปลงอ็อบเจกต์ใดๆ ให้เป็นนิพจน์คลาสสิก) ไม่จำเป็นต้องยกเช่นนี้สำหรับ mr[1] และ classical register ที่อาจตามมา เนื่องจากเป็น inputs ให้กับ expr.bit_xor และการยกที่จำเป็นจะเกิดขึ้นโดยอัตโนมัติในกรณีเหล่านี้ นิพจน์ดังกล่าวสามารถสร้างขึ้นภายในลูปและโครงสร้างอื่นได้
from qiskit import QuantumCircuit, QuantumRegister, ClassicalRegister
from qiskit.circuit.classical import expr

num_qubits = 8
if num_qubits % 2 or num_qubits < 4:
    raise ValueError("num_qubits must be an even integer ≥ 4")
meas_qubits = list(range(2, num_qubits, 2))  # qubits to measure and reset

qr = QuantumRegister(num_qubits, "qr")
mr = ClassicalRegister(len(meas_qubits), "m")
qc = QuantumCircuit(qr, mr)

# Create local Bell pairs
qc.reset(qr)
qc.h(qr[::2])
for ctrl in range(0, num_qubits, 2):
    qc.cx(qr[ctrl], qr[ctrl + 1])

# Glue neighboring pairs
for ctrl in range(1, num_qubits - 1, 2):
    qc.cx(qr[ctrl], qr[ctrl + 1])

# Measure boundary qubits between pairs,reset to 0
for k, q in enumerate(meas_qubits):
    qc.measure(qr[q], mr[k])
    qc.reset(qr[q])

# Parity-conditioned X corrections
# Each non-measured qubit gets flipped iff the parity (XOR) of all
# preceding measurement bits is 1
for tgt in range(num_qubits):
    if tgt in meas_qubits:  # skip measured qubits
        continue
    # all measurement registers whose physical qubit index < tgt
    left_bits = [k for k, q in enumerate(meas_qubits) if q < tgt]
    if not left_bits:  # skip if list empty
        continue

    # build XOR-parity expression
    parity = expr.lift(
        mr[left_bits[0]]
    )  # lift the first bit to Value so it will be treated like a boolean.
    for k in left_bits[1:]:
        parity = expr.bit_xor(
            mr[k], parity
        )  # calculate parity with all other bits
    with qc.if_test(parity):  # Add X if parity is 1
        qc.x(qr[tgt])

# Re-entangle measured qubits
for ctrl in range(1, num_qubits - 1, 2):
    qc.cx(qr[ctrl], qr[ctrl + 1])
qc.draw(output="mpl", style="iqp", idle_wires=False, fold=-1)
Store
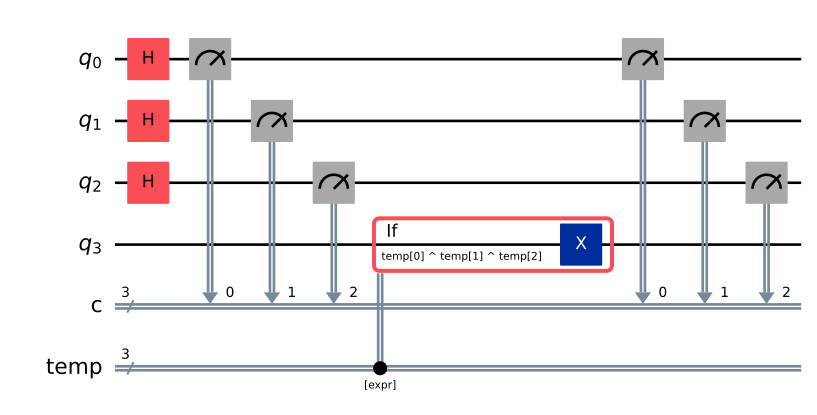
คุณสามารถใช้คำสั่ง store เพื่อบันทึกผลลัพธ์ของนิพจน์คลาสสิก หากนิพจน์นั้นจะถูกใช้ซ้ำหลายครั้ง การดำเนินการจะถูก parallelize โดยอัตโนมัติ ทำให้โค้ดของคุณมีประสิทธิภาพมากขึ้นอย่างมีนัยสำคัญในขณะรัน
ตัวอย่างเช่น การเขียน โดยที่ นั้นเป็นธรรมชาติกว่าและมีประสิทธิภาพมากกว่าในขณะรัน เมื่อเทียบกับ รูปแบบแรกคำนวณการนิเสธในขั้นตอนคู่ขนานเดียวก่อน XOR chain แทนที่จะคำนวณการนิเสธแต่ละอันตามลำดับภายในนิพจน์
ตัวอย่างเต็ม:
from qiskit.circuit import QuantumCircuit, QuantumRegister, ClassicalRegister
from qiskit.circuit.classical import expr

qregs = QuantumRegister(4, "q")
creg = ClassicalRegister(3, "c")
# temp is a plain ClassicalRegister used as the store target
temp = ClassicalRegister(3, "temp")
qc = QuantumCircuit(qregs, creg, temp)

qc.h([0, 1, 2])
qc.measure([0, 1, 2], creg)

# Store bit-NOT of the full 3-bit register into temp
qc.store(temp, expr.bit_not(creg))

# Compute parity of temp using bit-indexed XOR
parity = expr.bit_xor(
    expr.bit_xor(expr.index(temp, 0), expr.index(temp, 1)),
    expr.index(temp, 2),
)

# Flip q3 if parity of ~creg is 1
with qc.if_test(parity):
    qc.x(3)

qc.measure([0, 1, 2], creg)

qc.draw("mpl")
ขั้นตอนถัดไป
- เรียนรู้วิธีใช้ dynamic decoupling อย่างแม่นยำโดยใช้ stretch
- ใช้ circuit schedule visualization เพื่อ debug และปรับแต่ง dynamic circuits ของคุณ
- รัน dynamic circuits