จำลองโมเดล 2D tilted-field Ising ด้วยฟังก์ชัน QESEM
Qiskit Functions เป็นฟีเจอร์ทดลองที่ให้บริการเฉพาะผู้ใช้งาน IBM Quantum® Premium Plan, Flex Plan และ On-Prem (ผ่าน IBM Quantum Platform API) Plan เท่านั้น ขณะนี้อยู่ในสถานะ preview release และอาจมีการเปลี่ยนแปลงได้
ประมาณการเวลาใช้งาน: 20 นาทีบนโปรเซสเซอร์ Heron r2 (หมายเหตุ: เป็นเพียงการประมาณเท่านั้น เวลาจริงอาจแตกต่างกันได้)
พื้นหลัง
บทช่วยสอนนี้แสดงวิธีใช้ QESEM ซึ่งเป็น Qiskit Function ของ Qedma เพื่อจำลองพลวัตของโมเดลสปินควอนตัมแบบ canonical อย่างโมเดล 2D tilted-field Ising (TFI) ที่มีมุมแบบ non-Clifford:
โดยที่ หมายถึงเพื่อนบ้านที่อยู่ใกล้กันบนแลตทิซ การจำลองวิวัฒนาการตามเวลาของระบบควอนตัมแบบ many-body เป็นงานที่ท้าทายทางการคำนวณสำหรับคอมพิวเตอร์คลาสสิก ในทางตรงกันข้าม คอมพิวเตอร์ควอนตัมถูกออกแบบมาโดยธรรมชาติให้ทำงานนี้ได้อย่างมีประสิทธิภาพ โดยเฉพาะโมเดล TFI ได้กลายเป็น benchmark ยอดนิยมบนฮาร์ดแวร์ควอนตัม เนื่องจากพฤติกรรมทางฟิสิกส์ที่หลากหลายและการนำไปใช้บนฮาร์ดแวร์ที่ทำได้สะดวก
แทนที่จะจำลองพลวัตแบบต่อเนื่องตามเวลา เราใช้โมเดล kicked Ising ที่มีความสัมพันธ์กันอย่างใกล้ชิด พลวัตดังกล่าวสามารถแสดงออกมาได้อย่างแม่นยำในรูปแบบ Circuit ควอนตัมแบบ periodic โดยแต่ละขั้นตอนวิวัฒนาการประกอบด้วยสามชั้นของ Gate สองQubit แบบเศษส่วน สลับกับชั้นของ Gate หนึ่ง Qubit และ
เราจะใช้มุมทั่วไปที่ท้าทายทั้งสำหรับการจำลองแบบคลาสสิกและการลดข้อผิดพลาด โดยเฉพาะเราเลือก , และ ซึ่งทำให้โมเดลอยู่ห่างไกลจากจุด integrable ใดๆ
ในบทช่วยสอนนี้เราจะทำสิ่งต่อไปนี้:
- ประมาณเวลา QPU ที่คาดว่าจะใช้สำหรับการลดข้อผิดพลาดเต็มรูปแบบโดยใช้ฟีเจอร์การประมาณเวลาแบบวิเคราะห์และเชิงประจักษ์ของ QESEM
- สร้างและจำลอง Circuit โมเดล 2D tilted-field Ising โดยใช้เลย์เอาต์ Qubit และชั้น Gate ที่ได้รับแรงบันดาลใจจากฮาร์ดแวร์
- แสดงภาพการเชื่อมต่อ Qubit บนอุปกรณ์และ subgraph ที่เลือกสำหรับการทดลอง
- สาธิตการใช้ operator backpropagation (OBP) เพื่อลดความลึกของ Circuit เทคนิคนี้ตัดการดำเนินการออกจากปลาย Circuit โดยแลกกับการวัด operator มากขึ้น
- ดำเนินการลดข้อผิดพลาด (EM) แบบ unbiased สำหรับ observable หลายตัวพร้อมกันโดยใช้ QESEM และเปรียบเทียบผลลัพธ์ที่สมบูรณ์แบบ มีสัญญาณรบกวน และที่ผ่านการลดข้อผิดพลาด
- วิเคราะห์และพล็อตผลกระทบของการลดข้อผิดพลาดต่อค่า magnetization ในความลึก Circuit ที่แตกต่างกัน
หมายเหตุ: OBP โดยทั่วไปจะคืนค่า observable ชุดหนึ่งที่อาจไม่ commute กัน QESEM จะปรับ measurement basis ให้เหมาะสมโดยอัตโนมัติเมื่อ observable เป้าหมายมีเทอมที่ไม่ commute กัน ระบบจะสร้างชุด measurement basis ที่เป็นไปได้โดยใช้อัลกอริทึม heuristic หลายแบบและเลือกชุดที่ลดจำนวน basis ที่แตกต่างกันให้น้อยที่สุด ซึ่งหมายความว่า QESEM จะจัดกลุ่ม observable ที่เข้ากันได้ไว้ใน basis ร่วมกันเพื่อลดจำนวนการกำหนดค่าการวัดทั้งหมดที่จำเป็น ช่วยเพิ่มประสิทธิภาพ
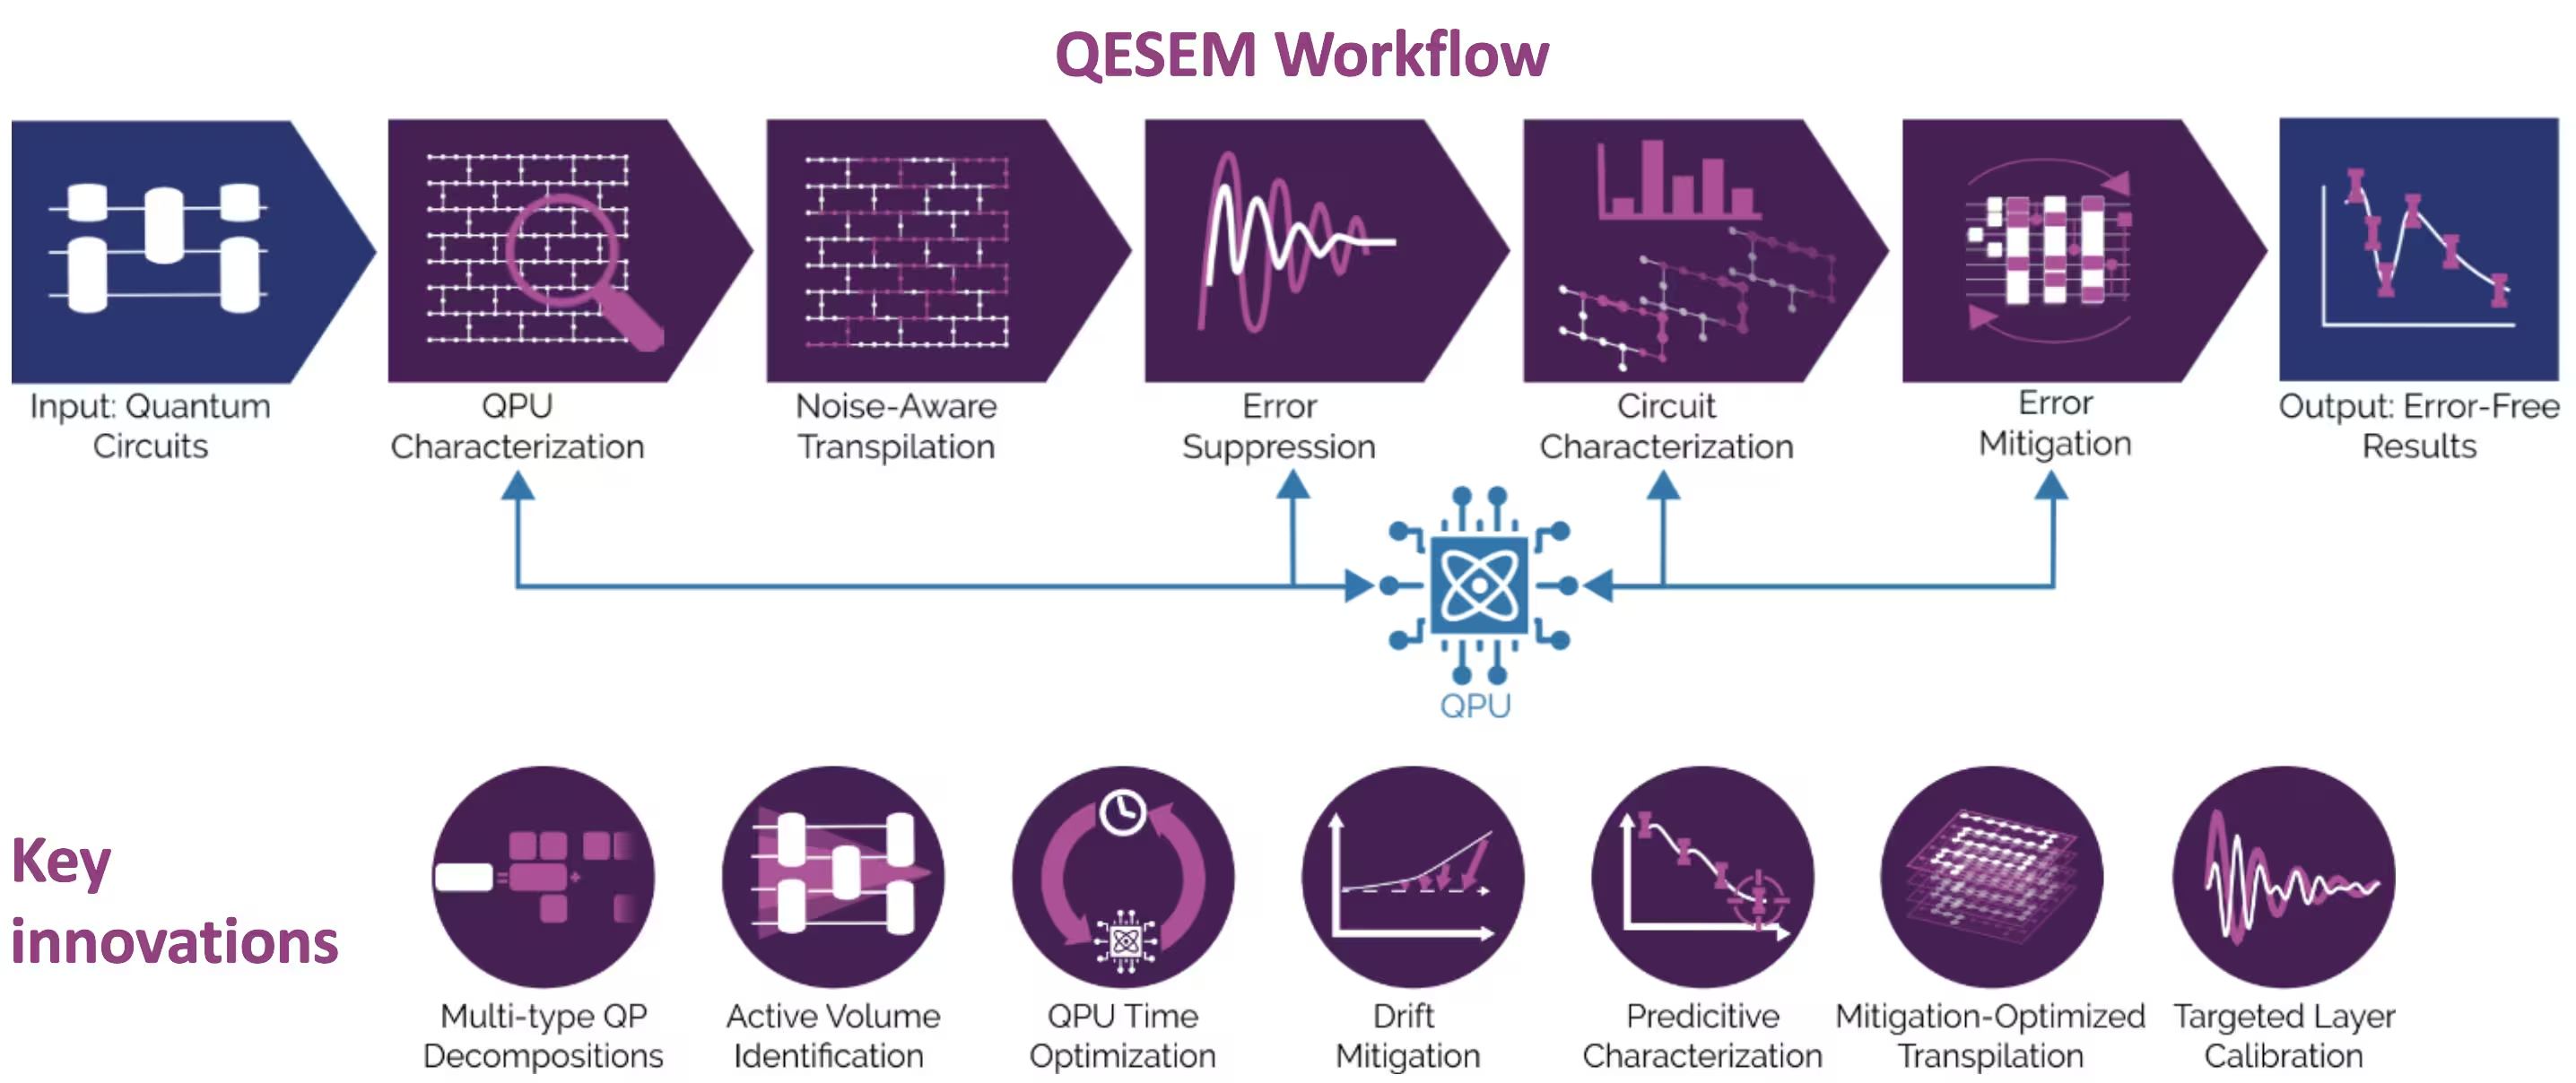
เกี่ยวกับ QESEM
QESEM เป็นซอฟต์แวร์ที่เชื่อถือได้ มีความแม่นยำสูง ใช้การ characterization เป็นพื้นฐาน ซึ่งนำไปใช้การลดข้อผิดพลาดแบบ quasi-probabilistic ที่มีประสิทธิภาพและ unbiased ออกแบบมาเพื่อลดข้อผิดพลาดใน Circuit ควอนตัมทั่วไปและไม่ขึ้นกับแอปพลิเคชัน ได้รับการตรวจสอบในแพลตฟอร์มฮาร์ดแวร์ที่หลากหลาย รวมถึงการทดลองระดับ utility บนอุปกรณ์ IBM® Eagle และ Heron ขั้นตอนการทำงานของ QESEM มีดังนี้:
- การ characterize อุปกรณ์ — แมปฟิดิลิตี้ Gate และระบุ coherent error ให้ข้อมูล calibration แบบ real-time ขั้นตอนนี้ทำให้มั่นใจว่าการลดข้อผิดพลาดใช้ประโยชน์จากการดำเนินการที่มีฟิดิลิตี้สูงสุดที่มีอยู่
- การ transpile แบบ noise-aware — สร้างและประเมิน qubit mapping ทางเลือก ชุดการดำเนินการ และ measurement basis โดยเลือกตัวเลือกที่ลดเวลา QPU ที่ประมาณไว้ให้น้อยที่สุด พร้อมตัวเลือก parallelization เพื่อเร่งการเก็บข้อมูล
- การลด error — กำหนด native gate ใหม่ ใช้ Pauli twirling และปรับ pulse-level control (บนแพลตฟอร์มที่รองรับ) เพื่อปรับปรุงฟิดิลิตี้
- การ characterize Circuit — สร้างโมเดล local error ที่ปรับแต่งเฉพาะและ fit กับการวัด QPU เพื่อวัดปริมาณ noise ที่เหลืออยู่
- การลดข้อผิดพลาด — สร้าง quasi-probabilistic decomposition หลายประเภท และสุ่มตัวอย่างจากพวกมันในกระบวนการแบบ adaptive ที่ลดเวลา QPU สำหรับ mitigation และความไวต่อความผันผวนของฮาร์ดแวร์ให้น้อยที่สุด บรรลุความแม่นยำสูงในปริมาตร Circuit ขนาดใหญ่
สำหรับข้อมูลเพิ่มเติมเกี่ยวกับ QESEM และการทดลองระดับ utility ของโมเดลนี้บน subgraph แบบ 103-Qubit high-connectivity ของรูปทรงเรขาคณิต heavy-hex ของ ibm_marrakesh โปรดดูที่ Reliable high-accuracy error mitigation for utility-scale quantum circuits.
ข้อกำหนด
ติดตั้งแพ็กเกจ Python ต่อไปนี้ก่อนรัน notebook:
- Qiskit SDK v2.0.0 หรือใหม่กว่า (
pip install qiskit) - Qiskit Runtime v0.40.0 หรือใหม่กว่า (
pip install qiskit-ibm-runtime) - Qiskit Functions Catalog v0.8.0 หรือใหม่กว่า (
pip install qiskit-ibm-catalog) - Operator Backpropagation Qiskit addon v0.3.0 หรือใหม่กว่า (
pip install qiskit-addon-obp) - Qiskit Utils addon v0.1.1 หรือใหม่กว่า (
pip install qiskit-addon-utils) - Qiskit Aer simulator v0.17.1 หรือใหม่กว่า (
pip install qiskit-aer) - Matplotlib v3.10.3 หรือใหม่กว่า (
pip install matplotlib)
การตั้งค่า
ก่อนอื่น ให้ import ไลบรารีที่เกี่ยวข้อง:
# Added by doQumentation — required packages for this notebook
!pip install -q matplotlib numpy qiskit qiskit-addon-obp qiskit-addon-utils qiskit-aer qiskit-ibm-catalog qiskit-ibm-runtime
%matplotlib inline

from typing import Sequence

import matplotlib.pyplot as plt
import numpy as np

import qiskit
from qiskit_ibm_runtime import EstimatorV2 as Estimator
from qiskit_ibm_catalog import QiskitFunctionsCatalog
from qiskit_aer import AerSimulator
from qiskit_addon_utils.slicing import combine_slices, slice_by_gate_types
from qiskit_addon_obp import backpropagate
from qiskit_addon_obp.utils.simplify import OperatorBudget
from qiskit_ibm_runtime import QiskitRuntimeService
from qiskit.visualization import (
    plot_gate_map,
)
ถัดไป ยืนยันตัวตนโดยใช้ API key จากแดชบอร์ด IBM Quantum Platform จากนั้นเลือก Qiskit Function ดังนี้ (สำหรับความปลอดภัย แนะนำให้ บันทึก credentials ไว้ในสภาพแวดล้อมโลคัล หากอยู่บนเครื่องที่เชื่อถือได้ เพื่อไม่ต้องกรอก API key ทุกครั้งที่ยืนยันตัวตน)
# Paste here your instance and token strings

instance = "YOUR_INSTANCE"
token = "YOUR_TOKEN"
channel = "ibm_quantum_platform"

catalog = QiskitFunctionsCatalog(
    channel=channel, token=token, instance=instance
)
qesem_function = catalog.load("qedma/qesem")
ขั้นตอนที่ 1: แปลง input แบบคลาสสิกเป็นปัญหาควอนตัม
เราเริ่มต้นด้วยการกำหนดฟังก์ชันที่สร้าง Trotter Circuit:
def trotter_circuit_from_layers(
    steps: int,
    theta_x: float,
    theta_z: float,
    theta_zz: float,
    layers: Sequence[Sequence[tuple[int, int]]],
    init_state: str | None = None,
) -> qiskit.QuantumCircuit:
    """
    Generates an ising trotter circuit
    :param steps: trotter steps
    :param theta_x: RX angle
    :param theta_z: RZ angle
    :param theta_zz: RZZ angle
    :param layers: list of layers (can be list of layers in device)
    :param init_state: Initial state to prepare.
     If None, will not prepare any state. If "+", will
     add Hadamard gates to all qubits.
    :return: QuantumCircuit
    """
    qubits = sorted({i for layer in layers for edge in layer for i in edge})
    circ = qiskit.QuantumCircuit(max(qubits) + 1)

    if init_state == "+":
        print("init_state = +")
        for q in qubits:
            circ.h(q)

    for _ in range(steps):
        for q in qubits:
            circ.rx(theta_x, q)
            circ.rz(theta_z, q)

        for layer in layers:
            for edge in layer:
                circ.rzz(theta_zz, *edge)
        circ.barrier(qubits)

    return circ
ถัดไป เราสร้างฟังก์ชันเพื่อคำนวณค่า expectation value ที่สมบูรณ์แบบโดยใช้ AerSimulator
สำหรับ Circuit ขนาดใหญ่ (30 Qubit ขึ้นไป) แนะนำให้ใช้ค่าที่คำนวณล่วงหน้าจากการจำลองแบบ belief-propagation (BP) PEPS โค้ดนี้รวมค่าที่คำนวณล่วงหน้าสำหรับ 35 Qubit เป็นตัวอย่าง โดยอิงจากแนวทาง BP สำหรับการวิวัฒนาการ PEPS tensor network ที่แนะนำ ในบทความนี้ (ซึ่งเราเรียกว่า PEPS-BP) โดยใช้แพ็กเกจ Python สำหรับ tensor-network ที่ชื่อ quimb.
def calculate_ideal_evs(circ, obs, num_qubits, step):
    # Predefined results for large circuits - calculated using
    # bppeps for 3, 5, 7, 9 trotter steps
    predefined_35 = [
        0.79537,
        0.78653,
        0.79699,
    ]

    if num_qubits == 35:
        print(
            "Using precalculated ideal values for large circuits calculated "
            "with belief propagation PEPS. Currently only for 35 qubits."
        )
        return predefined_35[step]

    else:
        simulator = AerSimulator()

        # Use Estimator primitive to get expectation value
        estimator = Estimator(simulator)
        sim_result = estimator.run([(circ, [obs])], precision=0.0001).result()

        # Extracting the result
        ideal_values = sim_result[0].data.evs[0]
        return ideal_values
เราใช้การแมปชั้น ที่อิงจากฮาร์ดแวร์ที่นำมาจากอุปกรณ์ Heron และตัดชั้นเหล่านั้นตามจำนวน Qubit ที่ต้องการจำลอง เรากำหนด subgraph สำหรับ 10, 21, 28 และ 35 Qubit ที่คงโครงสร้าง 2D ไว้ (สามารถเปลี่ยนเป็น subgraph ที่ชื่นชอบได้):
LAYERS_HERON_R2 = [  # the full set of hardware layers for Heron r2
    [
        (2, 3),
        (6, 7),
        (10, 11),
        (14, 15),
        (20, 21),
        (16, 23),
        (24, 25),
        (17, 27),
        (28, 29),
        (18, 31),
        (32, 33),
        (19, 35),
        (36, 41),
        (42, 43),
        (37, 45),
        (46, 47),
        (38, 49),
        (50, 51),
        (39, 53),
        (60, 61),
        (56, 63),
        (64, 65),
        (57, 67),
        (68, 69),
        (58, 71),
        (72, 73),
        (59, 75),
        (76, 81),
        (82, 83),
        (77, 85),
        (86, 87),
        (78, 89),
        (90, 91),
        (79, 93),
        (94, 95),
        (100, 101),
        (96, 103),
        (104, 105),
        (97, 107),
        (108, 109),
        (98, 111),
        (112, 113),
        (99, 115),
        (116, 121),
        (122, 123),
        (117, 125),
        (126, 127),
        (118, 129),
        (130, 131),
        (119, 133),
        (134, 135),
        (140, 141),
        (136, 143),
        (144, 145),
        (137, 147),
        (148, 149),
        (138, 151),
        (152, 153),
        (139, 155),
    ],
    [
        (1, 2),
        (3, 4),
        (5, 6),
        (7, 8),
        (9, 10),
        (11, 12),
        (13, 14),
        (21, 22),
        (23, 24),
        (25, 26),
        (27, 28),
        (29, 30),
        (31, 32),
        (33, 34),
        (40, 41),
        (43, 44),
        (45, 46),
        (47, 48),
        (49, 50),
        (51, 52),
        (53, 54),
        (55, 59),
        (61, 62),
        (63, 64),
        (65, 66),
        (67, 68),
        (69, 70),
        (71, 72),
        (73, 74),
        (80, 81),
        (83, 84),
        (85, 86),
        (87, 88),
        (89, 90),
        (91, 92),
        (93, 94),
        (95, 99),
        (101, 102),
        (103, 104),
        (105, 106),
        (107, 108),
        (109, 110),
        (111, 112),
        (113, 114),
        (120, 121),
        (123, 124),
        (125, 126),
        (127, 128),
        (129, 130),
        (131, 132),
        (133, 134),
        (135, 139),
        (141, 142),
        (143, 144),
        (145, 146),
        (147, 148),
        (149, 150),
        (151, 152),
        (153, 154),
    ],
    [
        (3, 16),
        (7, 17),
        (11, 18),
        (22, 23),
        (26, 27),
        (30, 31),
        (34, 35),
        (21, 36),
        (25, 37),
        (29, 38),
        (33, 39),
        (41, 42),
        (44, 45),
        (48, 49),
        (52, 53),
        (43, 56),
        (47, 57),
        (51, 58),
        (62, 63),
        (66, 67),
        (70, 71),
        (74, 75),
        (61, 76),
        (65, 77),
        (69, 78),
        (73, 79),
        (81, 82),
        (84, 85),
        (88, 89),
        (92, 93),
        (83, 96),
        (87, 97),
        (91, 98),
        (102, 103),
        (106, 107),
        (110, 111),
        (114, 115),
        (101, 116),
        (105, 117),
        (109, 118),
        (113, 119),
        (121, 122),
        (124, 125),
        (128, 129),
        (132, 133),
        (123, 136),
        (127, 137),
        (131, 138),
        (142, 143),
        (146, 147),
        (150, 151),
        (154, 155),
        (0, 1),
        (4, 5),
        (8, 9),
        (12, 13),
        (54, 55),
        (15, 19),
    ],
]

subgraphs = {  # the subgraphs for the different qubit counts such that it's 2D
    10: list(range(22, 29)) + [16, 17, 37],
    21: list(range(3, 12)) + list(range(23, 32)) + [16, 17, 18],
    28: list(range(3, 12))
    + list(range(23, 32))
    + list(range(45, 50))
    + [16, 17, 18, 37, 38],
    35: list(range(3, 12))
    + list(range(21, 32))
    + list(range(41, 50))
    + [16, 17, 18, 36, 37, 38],
    42: list(range(3, 12))
    + list(range(21, 32))
    + list(range(41, 50))
    + list(range(63, 68))
    + [16, 17, 18, 36, 37, 38, 56, 57],
}

n_qubits = 35  # 21, 28, 35, 42
layers = [
    [
        edge
        for edge in layer
        if edge[0] in subgraphs[n_qubits] and edge[1] in subgraphs[n_qubits]
    ]
    for layer in LAYERS_HERON_R2
]

print(layers)
[[(6, 7), (10, 11), (16, 23), (24, 25), (17, 27), (28, 29), (18, 31), (36, 41), (42, 43), (37, 45), (46, 47), (38, 49)], [(3, 4), (5, 6), (7, 8), (9, 10), (21, 22), (23, 24), (25, 26), (27, 28), (29, 30), (43, 44), (45, 46), (47, 48)], [(3, 16), (7, 17), (11, 18), (22, 23), (26, 27), (30, 31), (21, 36), (25, 37), (29, 38), (41, 42), (44, 45), (48, 49), (4, 5), (8, 9)]]
ตอนนี้เราแสดงภาพเลย์เอาต์ Qubit บนอุปกรณ์ Heron สำหรับ subgraph ที่เลือก:
service = QiskitRuntimeService(
    channel=channel,
    token=token,
    instance=instance,
)
backend = service.backend("ibm_fez")  # or any available device

selected_qubits = subgraphs[n_qubits]
num_qubits = backend.configuration().num_qubits
qubit_color = [
    "#ff7f0e" if i in selected_qubits else "#d3d3d3"
    for i in range(num_qubits)
]

plot_gate_map(
    backend=backend,
    figsize=(15, 10),
    qubit_color=qubit_color,
)
plt.show()
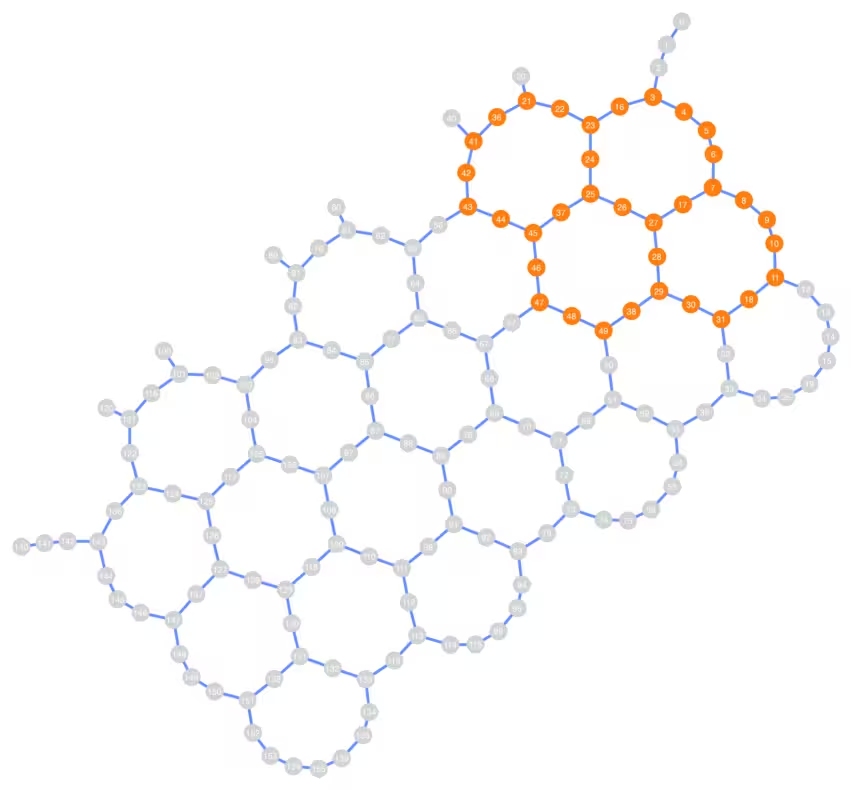
สังเกตว่าการเชื่อมต่อของเลย์เอาต์ Qubit ที่เลือกนั้นไม่จำเป็นต้องเป็นแบบเชิงเส้น และสามารถครอบคลุมพื้นที่ขนาดใหญ่ของอุปกรณ์ Heron ได้ขึ้นอยู่กับจำนวน Qubit ที่เลือก
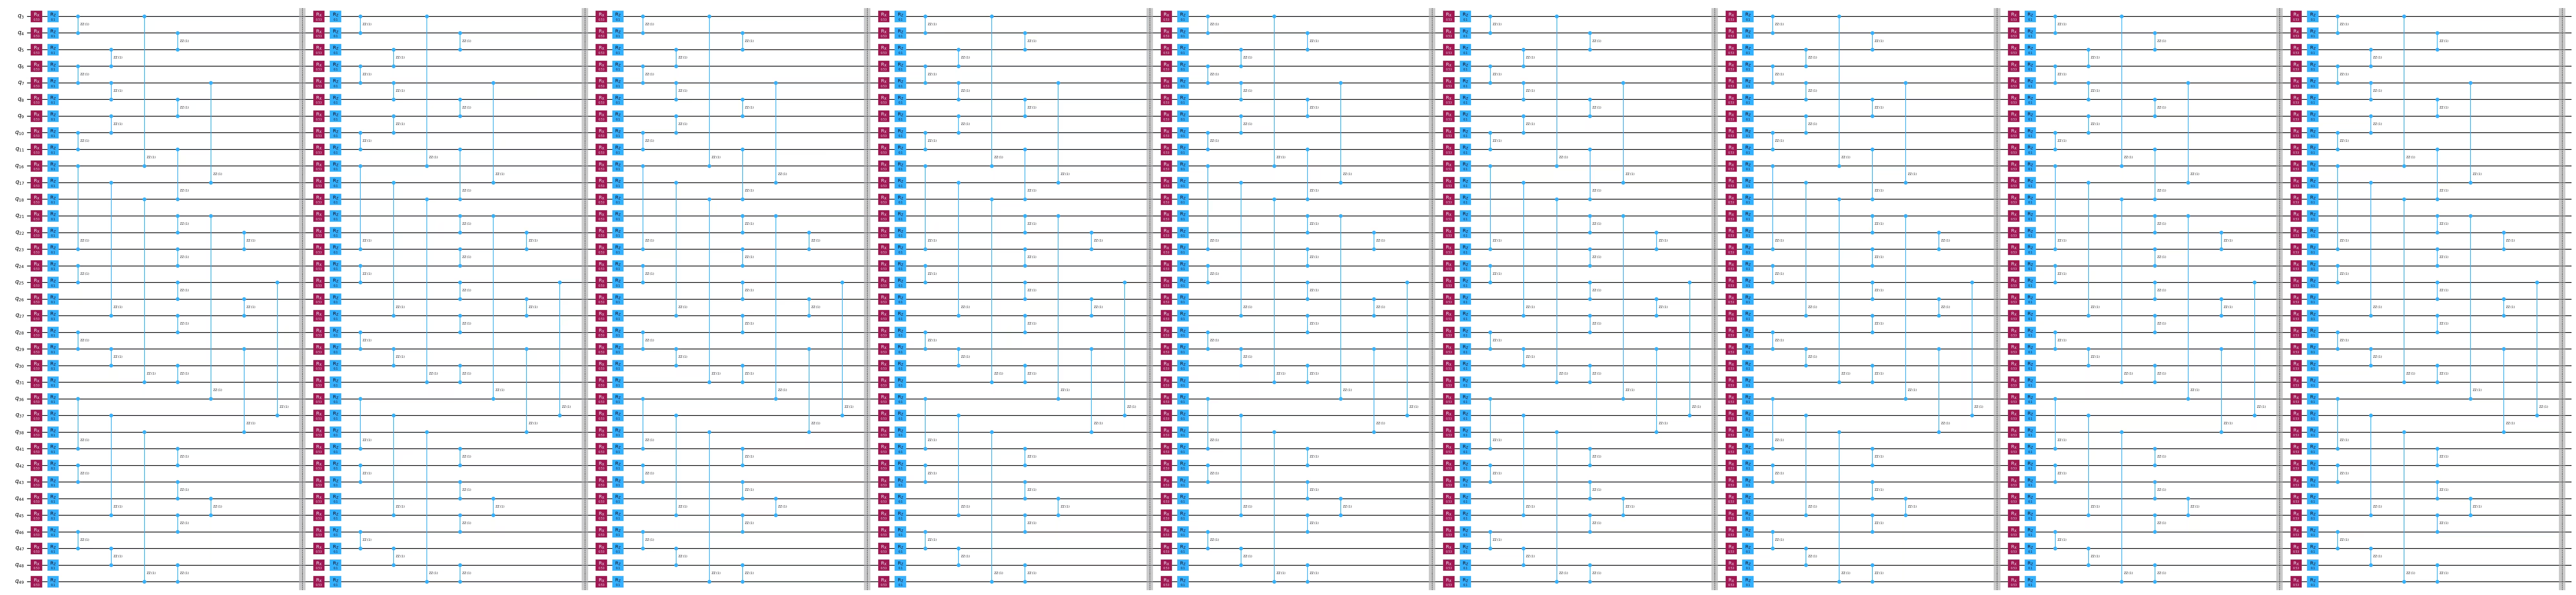
ตอนนี้เราสร้าง Trotter Circuit และ observable ค่า magnetization เฉลี่ยสำหรับจำนวน Qubit และพารามิเตอร์ที่เลือก:
# Chosen parameters:
theta_x = 0.53
theta_z = 0.1
theta_zz = 1.0
steps = 9

circ = trotter_circuit_from_layers(steps, theta_x, theta_z, theta_zz, layers)
print(
    f"Circuit 2q layers: "
    f"{circ.depth(filter_function=lambda instr: len(instr.qubits) == 2)}"
)
print("\nCircuit structure:")

circ.draw("mpl", scale=0.8, fold=-1, idle_wires=False)
plt.show()

observable = qiskit.quantum_info.SparsePauliOp.from_sparse_list(
    [("Z", [q], 1 / n_qubits) for q in subgraphs[n_qubits]],
    np.max(subgraphs[n_qubits]) + 1,
)  # Average magnetization observable

print(observable)
obs_list = [observable]
Circuit 2q layers: 27

Circuit structure:
SparsePauliOp(['IIIIIIIIIIIIIIIIIIIIIIIIIIIIIIIIIIIIIIIIIIIIIIZIII', 'IIIIIIIIIIIIIIIIIIIIIIIIIIIIIIIIIIIIIIIIIIIIIZIIII', 'IIIIIIIIIIIIIIIIIIIIIIIIIIIIIIIIIIIIIIIIIIIIZIIIII', 'IIIIIIIIIIIIIIIIIIIIIIIIIIIIIIIIIIIIIIIIIIIZIIIIII', 'IIIIIIIIIIIIIIIIIIIIIIIIIIIIIIIIIIIIIIIIIIZIIIIIII', 'IIIIIIIIIIIIIIIIIIIIIIIIIIIIIIIIIIIIIIIIIZIIIIIIII', 'IIIIIIIIIIIIIIIIIIIIIIIIIIIIIIIIIIIIIIIIZIIIIIIIII', 'IIIIIIIIIIIIIIIIIIIIIIIIIIIIIIIIIIIIIIIZIIIIIIIIII', 'IIIIIIIIIIIIIIIIIIIIIIIIIIIIIIIIIIIIIIZIIIIIIIIIII', 'IIIIIIIIIIIIIIIIIIIIIIIIIIIIZIIIIIIIIIIIIIIIIIIIII', 'IIIIIIIIIIIIIIIIIIIIIIIIIIIZIIIIIIIIIIIIIIIIIIIIII', 'IIIIIIIIIIIIIIIIIIIIIIIIIIZIIIIIIIIIIIIIIIIIIIIIII', 'IIIIIIIIIIIIIIIIIIIIIIIIIZIIIIIIIIIIIIIIIIIIIIIIII', 'IIIIIIIIIIIIIIIIIIIIIIIIZIIIIIIIIIIIIIIIIIIIIIIIII', 'IIIIIIIIIIIIIIIIIIIIIIIZIIIIIIIIIIIIIIIIIIIIIIIIII', 'IIIIIIIIIIIIIIIIIIIIIIZIIIIIIIIIIIIIIIIIIIIIIIIIII', 'IIIIIIIIIIIIIIIIIIIIIZIIIIIIIIIIIIIIIIIIIIIIIIIIII', 'IIIIIIIIIIIIIIIIIIIIZIIIIIIIIIIIIIIIIIIIIIIIIIIIII', 'IIIIIIIIIIIIIIIIIIIZIIIIIIIIIIIIIIIIIIIIIIIIIIIIII', 'IIIIIIIIIIIIIIIIIIZIIIIIIIIIIIIIIIIIIIIIIIIIIIIIII', 'IIIIIIIIZIIIIIIIIIIIIIIIIIIIIIIIIIIIIIIIIIIIIIIIII', 'IIIIIIIZIIIIIIIIIIIIIIIIIIIIIIIIIIIIIIIIIIIIIIIIII', 'IIIIIIZIIIIIIIIIIIIIIIIIIIIIIIIIIIIIIIIIIIIIIIIIII', 'IIIIIZIIIIIIIIIIIIIIIIIIIIIIIIIIIIIIIIIIIIIIIIIIII', 'IIIIZIIIIIIIIIIIIIIIIIIIIIIIIIIIIIIIIIIIIIIIIIIIII', 'IIIZIIIIIIIIIIIIIIIIIIIIIIIIIIIIIIIIIIIIIIIIIIIIII', 'IIZIIIIIIIIIIIIIIIIIIIIIIIIIIIIIIIIIIIIIIIIIIIIIII', 'IZIIIIIIIIIIIIIIIIIIIIIIIIIIIIIIIIIIIIIIIIIIIIIIII', 'ZIIIIIIIIIIIIIIIIIIIIIIIIIIIIIIIIIIIIIIIIIIIIIIIII', 'IIIIIIIIIIIIIIIIIIIIIIIIIIIIIIIIIZIIIIIIIIIIIIIIII', 'IIIIIIIIIIIIIIIIIIIIIIIIIIIIIIIIZIIIIIIIIIIIIIIIII', 'IIIIIIIIIIIIIIIIIIIIIIIIIIIIIIIZIIIIIIIIIIIIIIIIII', 'IIIIIIIIIIIIIZIIIIIIIIIIIIIIIIIIIIIIIIIIIIIIIIIIII', 'IIIIIIIIIIIIZIIIIIIIIIIIIIIIIIIIIIIIIIIIIIIIIIIIII', 'IIIIIIIIIIIZIIIIIIIIIIIIIIIIIIIIIIIIIIIIIIIIIIIIII'],
              coeffs=[0.02857143+0.j, 0.02857143+0.j, 0.02857143+0.j, 0.02857143+0.j,
 0.02857143+0.j, 0.02857143+0.j, 0.02857143+0.j, 0.02857143+0.j,
 0.02857143+0.j, 0.02857143+0.j, 0.02857143+0.j, 0.02857143+0.j,
 0.02857143+0.j, 0.02857143+0.j, 0.02857143+0.j, 0.02857143+0.j,
 0.02857143+0.j, 0.02857143+0.j, 0.02857143+0.j, 0.02857143+0.j,
 0.02857143+0.j, 0.02857143+0.j, 0.02857143+0.j, 0.02857143+0.j,
 0.02857143+0.j, 0.02857143+0.j, 0.02857143+0.j, 0.02857143+0.j,
 0.02857143+0.j, 0.02857143+0.j, 0.02857143+0.j, 0.02857143+0.j,
 0.02857143+0.j, 0.02857143+0.j, 0.02857143+0.j])
ขั้นตอนที่ 2: ปรับแต่งปัญหาสำหรับการรันบนฮาร์ดแวร์ควอนตัม
การประมาณเวลา QPU แบบมีและไม่มี OBP
โดยทั่วไปผู้ใช้อยากรู้ว่าต้องใช้เวลา QPU เท่าไหร่สำหรับการทดลองของตน อย่างไรก็ตาม นี่ถือเป็นปัญหาที่ยากสำหรับคอมพิวเตอร์คลาสสิก
QESEM มีสองโหมดในการประมาณเวลาเพื่อแจ้งให้ผู้ใช้ทราบถึงความเป็นไปได้ของการทดลอง:
- การประมาณเวลาแบบวิเคราะห์ - ให้การประมาณคร่าวๆ และไม่ต้องใช้เวลา QPU เลย สามารถใช้เพื่อทดสอบว่า transpilation pass จะลดเวลา QPU ได้หรือไม่
- การประมาณเวลาเชิงประจักษ์ (แสดงที่นี่) - ให้การประมาณที่ค่อนข้างดีและใช้เวลา QPU สองสามนาที
ในทั้งสองกรณี QESEM จะแสดงผลการประมาณเวลาสำหรับการบรรลุความแม่นยำที่ต้องการสำหรับ observable ทั้งหมด
run_on_real_hardware = True

precision = 0.05
if run_on_real_hardware:
    backend_name = "ibm_fez"
else:
    backend_name = "fake_fez"

# Start a job for empirical time estimation
estimation_job_wo_obp = qesem_function.run(
    pubs=[(circ, obs_list)],
    instance=instance,
    backend_name=backend_name,  # E.g. "ibm_brisbane"
    options={
        # "empirical" - gets actual time estimates without running full mitigation
        "estimate_time_only": "empirical",
        "max_execution_time": 120,  # Limits the QPU time, specified in seconds.
        "default_precision": precision,
    },
)
print(estimation_job_wo_obp.job_id)
print(estimation_job_wo_obp.status())
17d3828e-9fdb-482e-8e9b-392f3eefe313
DONE
# Get the result object (blocking method).
# Use job.status() in a loop for non-blocking.
# This takes 1-3 minutes
result = estimation_job_wo_obp.result()
print(
    f"Empirical time estimation (sec): {result[0].metadata['time_estimation_sec']}"
)
Empirical time estimation (sec): 1200
ตอนนี้เราจะใช้ operator backpropagation (OBP) (ดูเอกสาร OBP สำหรับรายละเอียดเพิ่มเติมเกี่ยวกับ OBP Qiskit addon) เราจะสร้างฟังก์ชันที่สร้าง circuit slices สำหรับการ backpropagation:
def run_backpropagation(circ_vec, observable, steps_vec, max_qwc_groups=8):
    """
    Runs backpropagation for a list of circuits and observables.
    Returns lists of backpropagated circuits and observables.
    """
    op_budget = OperatorBudget(max_qwc_groups=max_qwc_groups)
    bp_circuit_vec = []
    bp_observable_vec = []

    for i, circ in enumerate(circ_vec):
        slices = slice_by_gate_types(circ)
        bp_observable, remaining_slices, metadata = backpropagate(
            observable,
            slices,
            operator_budget=op_budget,
        )
        bp_circuit = combine_slices(remaining_slices, include_barriers=True)
        bp_circuit_vec.append(bp_circuit)
        bp_observable_vec.append(bp_observable)
        print(f"n.o. steps: {steps_vec[i]}")
        print(f"Backpropagated {metadata.num_backpropagated_slices} slices.")
        print(
            f"New observable has {len(bp_observable.paulis)} terms, "
            f"which can be combined into "
            f"{len(bp_observable.group_commuting(qubit_wise=True))} groups.\n"
            f"After truncation, the error in our observable is bounded by "
            f"{metadata.accumulated_error(0):.3e}"
        )
        print("-----------------")
    return bp_circuit_vec, bp_observable_vec
เรียกใช้ฟังก์ชัน:
bp_circ_vec, bp_obs_vec = run_backpropagation([circ], observable, [steps])
n.o. steps: 9
Backpropagated 11 slices.
New observable has 363 terms, which can be combined into 4 groups.
After truncation, the error in our observable is bounded by 0.000e+00
-----------------
print("The remaining circuit after backpropagation looks as follows:")
bp_circ_vec[-1].draw("mpl", scale=0.8, fold=-1, idle_wires=False)
None
The remaining circuit after backpropagation looks as follows:

จะเห็นว่า backpropagation ลด Circuit สองเลเยอร์ออกไปได้ ตอนนี้ที่เรามี Circuit ที่ลดขนาดแล้วและ observable ที่ขยายออกแล้ว มาทำการประมาณเวลาสำหรับ Circuit ที่ผ่าน backpropagation:
# Start a job for empirical time estimation
estimation_job_obp = qesem_function.run(
    pubs=[(bp_circ_vec[-1], [bp_obs_vec[-1]])],
    instance=instance,
    backend_name=backend_name,
    options={
        "estimate_time_only": "empirical",
        "max_execution_time": 120,
        "default_precision": precision,
    },
)
print(estimation_job_obp.job_id)
print(estimation_job_obp.status())
8bae699d-a16b-4d39-bbd9-d123fbcce55d
DONE
result_obp = estimation_job_obp.result()
print(
    f"Empirical time estimation (sec): {result_obp[0].metadata['time_estimation_sec']}"
)
Empirical time estimation (sec): 900
จะเห็นว่า OBP ช่วยลดต้นทุนด้านเวลาสำหรับการ mitigation ของ Circuit
ขั้นตอนที่ 3: รันด้วย Qiskit primitives
รันบน Backend จริง
ตอนนี้เรารันการทดลองแบบเต็มรูปแบบบน Trotter สองสามขั้น จำนวน Qubit ความแม่นยำที่ต้องการ และเวลา QPU สูงสุดสามารถปรับได้ตามทรัพยากร QPU ที่มี โปรดทราบว่าการจำกัดเวลา QPU สูงสุดจะส่งผลต่อความแม่นยำของผลลัพธ์สุดท้าย ดังที่จะเห็นในกราฟสุดท้ายด้านล่าง
เราวิเคราะห์ Circuit สี่แบบที่มี 5, 7 และ 9 Trotter steps ด้วยความแม่นยำ 0.05 โดยเปรียบเทียบค่า expectation values ที่ ideal, noisy และผ่านการแก้ไขข้อผิดพลาด:
steps_vec = [5, 7, 9]

circ_vec = []
for steps in steps_vec:
    circ = trotter_circuit_from_layers(
        steps, theta_x, theta_z, theta_zz, layers
    )
    circ_vec.append(circ)
อีกครั้ง เรารัน OBP บน Circuit แต่ละอันเพื่อลดเวลาการรัน:
bp_circ_vec_35, bp_obs_vec_35 = run_backpropagation(
    circ_vec, observable, steps_vec
)
n.o. steps: 5
Backpropagated 11 slices.
New observable has 363 terms, which can be combined into 4 groups.
After truncation, the error in our observable is bounded by 0.000e+00
-----------------
n.o. steps: 7
Backpropagated 11 slices.
New observable has 363 terms, which can be combined into 4 groups.
After truncation, the error in our observable is bounded by 0.000e+00
-----------------
n.o. steps: 9
Backpropagated 11 slices.
New observable has 363 terms, which can be combined into 4 groups.
After truncation, the error in our observable is bounded by 0.000e+00
-----------------
ตอนนี้เรารัน batch ของงาน QESEM แบบเต็มรูปแบบ เราจำกัดเวลา QPU สูงสุดสำหรับแต่ละจุดเพื่อควบคุมงบ QPU ได้ดีขึ้น
run_on_real_hardware = True

precision = 0.05
if run_on_real_hardware:
    backend_name = "ibm_marrakesh"
else:
    backend_name = "fake_fez"
# Running full jobs for:
pubs_list = [
    [(bp_circ_vec_35[i], bp_obs_vec_35[i])] for i in range(len(bp_obs_vec_35))
]
# Initiating multiple jobs for different lengths
job_list = []
for pubs in pubs_list:
    job_obp = qesem_function.run(
        pubs=pubs,
        instance=instance,
        backend_name=backend_name,  # E.g. "ibm_brisbane"
        options={
            "max_execution_time": 300,  # Limits the QPU time, specified in seconds.
            "default_precision": 0.05,
        },
    )
    job_list.append(job_obp)
ที่นี่เราตรวจสอบสถานะของแต่ละงาน:
for job in job_list:
    print(job.status())
DONE
DONE
DONE
DONE
ขั้นตอนที่ 4: ประมวลผลหลังการรันและส่งผลลัพธ์ในรูปแบบ classical ที่ต้องการ
เมื่องานทั้งหมดรันเสร็จแล้ว เราสามารถเปรียบเทียบค่า expectation value แบบ noisy และแบบที่ผ่านการแก้ไขแล้วได้
ideal_values = []
noisy_values = []
error_mitigated_values = []
error_mitigated_stds = []

for i in range(len(job_list)):
    job = job_list[i]
    result = job.result()  # Blocking - takes 3-5 minutes
    noisy_results = result[0].metadata["noisy_results"]

    ideal_val = calculate_ideal_evs(circ_vec[i], observable, n_qubits, i)
    print("---------------------------------")
    print(f"Ideal: {ideal_val}")
    print(f"Noisy: {noisy_results.evs}")
    print(f"QESEM: {result[0].data.evs} \u00b1 {result[0].data.stds}")

    ideal_values.append(ideal_val)
    noisy_values.append(noisy_results.evs)
    error_mitigated_values.append(result[0].data.evs)
    error_mitigated_stds.append(result[0].data.stds)
Using precalculated ideal values for large circuits calculated with belief propagation PEPS. Currently only for 35 qubits.
---------------------------------
Ideal: 0.79537
Noisy: 0.7039237951821501
QESEM: 0.7828018244130982 ± 0.013257266977728376
Using precalculated ideal values for large circuits calculated with belief propagation PEPS. Currently only for 35 qubits.
---------------------------------
Ideal: 0.78653
Noisy: 0.6478583812958806
QESEM: 0.7875259197423828 ± 0.02703045139248604
Using precalculated ideal values for large circuits calculated with belief propagation PEPS. Currently only for 35 qubits.
---------------------------------
Ideal: 0.79699
Noisy: 0.6171787879868142
QESEM: 0.6918791909168913 ± 0.0740873782039517
สุดท้าย เราสามารถพล็อตค่าแม่เหล็กสัมพัทธ์เทียบกับจำนวน steps ได้ ซึ่งสรุปประโยชน์ของการใช้ QESEM Qiskit Function สำหรับการแก้ไขข้อผิดพลาดแบบไม่มี bias บนอุปกรณ์ quantum แบบ noisy
plt.plot(steps_vec, ideal_values, "--", label="ideal")
plt.scatter(steps_vec, noisy_values, label="noisy")
plt.errorbar(
    steps_vec,
    error_mitigated_values,
    yerr=error_mitigated_stds,
    fmt="o",
    capsize=5,
    label="QESEM mitigation",
)
plt.legend()
plt.xlabel("n.o. steps")
plt.ylabel("Magnetization")
Text(0, 0.5, 'Magnetization')

ขั้นตอนที่เก้ามี error bar ทางสถิติขนาดใหญ่ เนื่องจากเราจำกัดเวลา QPU ไว้ที่ 5 นาที หากรันขั้นตอนนี้นาน 15 นาที (ตามที่การประมาณเวลาเชิงประสบการณ์แนะนำ) คุณจะได้ error bar ที่เล็กลง ดังนั้น ค่าที่ผ่านการแก้ไขแล้วจะใกล้เคียงกับค่า ideal มากขึ้น