จำแนกความเสี่ยงด้านเครดิตด้วย Quantum Feature Extraction ของ Rimay จาก Kipu Quantum
Qiskit Functions เป็นฟีเจอร์ทดลองที่ใช้ได้เฉพาะผู้ใช้ IBM Quantum® Premium Plan, Flex Plan และ On-Prem (ผ่าน IBM Quantum Platform API) Plan เท่านั้น อยู่ในสถานะ preview release และอาจเปลี่ยนแปลงได้
ประมาณการการใช้งาน: 2 นาทีบนโปรเซสเซอร์ Nighthawk r2 (หมายเหตุ: นี่เป็นเพียงค่าประมาณ เวลารันจริงของคุณอาจต่างออกไป)
ผลลัพธ์การเรียนรู้
-
เตรียมข้อมูลตารางที่มีคอลัมน์เชิงหมวดหมู่และเชิงตัวเลขสำหรับ Qiskit Function ของ Rimay
-
ฟิต feature mapping เชิงควอนตัมบนข้อมูลฝึก และแมปข้อมูลทดสอบในการรันเดียวกัน
-
ฝึกโมเดลคลาสสิกบนฟีเจอร์ที่ผ่านการแปลงควอนตัม ทั้งแบบใช้เดี่ยวๆ และรวมกับฟีเจอร์เดิม
-
เปรียบเทียบผลลัพธ์กับ baseline แบบคลาสสิกล้วน
ความรู้พื้นฐานที่ต้องมี
ก่อนเริ่มบทเรียนนี้ คุณควรคุ้นเคยกับหัวข้อต่อไปนี้:
-
Supervised classification ด้วย scikit-learn
ความเป็นมา
ปัญหา machine learning จำนวนมากในอุตสาหกรรมใช้ชุดข้อมูลตารางขนาดเล็กถึงกลาง ซึ่งเพิ่มข้อมูลไม่ได้และความแม่นยำของโมเดลก็ไม่ขยับขึ้นอีก การให้คะแนนความเสี่ยงสินเชื่อเป็นตัวอย่างทั่วไป ผู้ให้กู้ใช้คุณลักษณะไม่กี่สิบข้อเพื่อตัดสินว่าผู้สมัครน่าจะชำระคืนสินเชื่อหรือไม่
Rimay ซึ่งเป็น Qiskit Function โดย Kipu Quantum เพิ่มขั้นตอน quantum preprocessing เข้าไปใน pipeline แบบนี้ โดยใช้อัลกอริทึม digitized counterdiabatic quantum feature extraction [1] ฟีเจอร์อินพุตแต่ละตัวจะถูกแมปไปยัง qubit หนึ่งตัว ค่าของฟีเจอร์และ mutual information ระหว่างฟีเจอร์กำหนด local field และ coupling ของ Hamiltonian แบบ spin-glass จากนั้นพลวัต counterdiabatic จะพัฒนาระบบควอนตัมไปสู่สถานะพลังงานต่ำ และค่าคาดหมายแบบ single-body และ two-body ที่วัดได้ตอนท้ายจะกลายเป็นฟีเจอร์ใหม่ที่ผ่านการแปลงด้วยควอนตัม ฟีเจอร์เหล่านี้จับความสัมพันธ์ไม่เชิงเส้นระหว่างอินพุต และคุณสามารถป้อนให้โมเดลคลาสสิกใดก็ได้
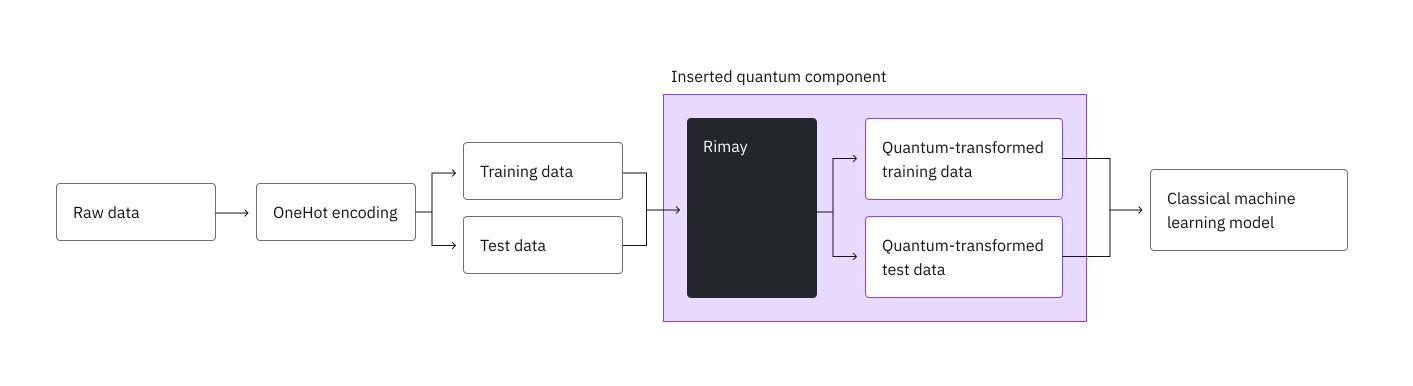
บทเรียนนี้ใช้ชุดข้อมูล German credit จาก OpenML [2] ซึ่งมีผู้สมัคร 1000 คนและ 20 คุณลักษณะ เพื่อฝึก random forest classifier ก่อนอื่นคุณจะสร้าง baseline แบบคลาสสิก จากนั้นส่งข้อมูลไปยัง Rimay และสุดท้ายฝึกโมเดลชนิดเดียวกันบนฟีเจอร์ที่ผ่านการแปลงด้วยควอนตัม ทั้งแบบใช้ฟีเจอร์เหล่านั้นอย่างเดียวและแบบรวมกับฟีเจอร์ดั้งเดิม
สิ่งที่ต้องมี
ก่อนเริ่มบทเรียนนี้ ตรวจสอบให้แน่ใจว่าคุณติดตั้งแพ็กเกจต่อไปนี้แล้ว
-
IBM Quantum Compute client (
pip install qiskit-ibm-runtime) -
Qiskit Functions (
pip install qiskit-ibm-catalog) -
scikit-learn (
pip install scikit-learn) -
pandas (
pip install pandas) -
Matplotlib (
pip install matplotlib)
คุณยังต้องมีสิทธิ์เข้าถึงฟังก์ชัน Rimay จาก Qiskit Functions Catalog ด้วย
การตั้งค่า
นำเข้าแพ็กเกจและกำหนด helper สองตัว ตัวหนึ่งฝึก random forest และอีกตัวคำนวณเมตริกที่ใช้ตลอดบทเรียน
# Added by doQumentation — installs the packages this notebook needs if they are missing
import importlib.util

_needed = {"matplotlib": "matplotlib", "numpy": "numpy", "pandas": "pandas", "qiskit_ibm_catalog": "qiskit-ibm-catalog", "sklearn": "scikit-learn"}
_missing = [pip for module, pip in _needed.items()
            if importlib.util.find_spec(module) is None]
# One at a time, so a package that fails to install does not block the others
for _pip in _missing:
    %pip install -q {_pip}
if not _missing:
    print("\u2713 All required packages are installed")
import matplotlib.pyplot as plt
import numpy as np
import pandas as pd
from qiskit_ibm_catalog import QiskitFunctionsCatalog
from sklearn.datasets import fetch_openml
from sklearn.ensemble import RandomForestClassifier
from sklearn.metrics import (
    accuracy_score,
    f1_score,
    precision_score,
    recall_score,
    roc_auc_score,
)
from sklearn.model_selection import train_test_split
from sklearn.preprocessing import OneHotEncoder

def train_random_forest(x, y, n_estimators, max_depth):
    """Train a random forest classifier with fixed hyperparameters."""
    model = RandomForestClassifier(
        n_estimators=n_estimators,
        max_depth=max_depth,
        min_samples_split=5,
        min_samples_leaf=1,
        max_features="sqrt",
        random_state=42,
        n_jobs=-1,
    )
    return model.fit(x, y)

def evaluate(model, x, y):
    """Return the classification metrics of a trained model on a test set."""
    y_pred = model.predict(x)
    y_proba = model.predict_proba(x)[:, 1]
    return {
        "Accuracy": accuracy_score(y, y_pred),
        "AUC": roc_auc_score(y, y_proba),
        "F1 score": f1_score(y, y_pred),
        "Precision": precision_score(y, y_pred),
        "Recall": recall_score(y, y_pred),
    }
ตั้งค่า IBM Quantum credentials
ยืนยันตัวตนด้วย IBM Quantum Platform API key ของคุณ โหลดฟังก์ชัน Rimay และเลือกตัวประมวลผลควอนตัมที่ว่างที่สุดซึ่งใช้ได้กับ instance ของคุณ
catalog = QiskitFunctionsCatalog(channel="ibm_quantum_platform")
rimay = catalog.load("kipu-quantum/rimay")

backend = catalog.least_busy(operational=True, simulator=False)
print(backend.name, backend.num_qubits)
ibm_fez 156
ขั้นตอนที่ 1: แมปอินพุตคลาสสิกไปเป็นปัญหาควอนตัม
Rimay แมปฟีเจอร์อินพุตตัวเลขทุกตัวไปยัง qubit หนึ่งตัว ดังนั้นขั้นแรกคือแปลงตารางดิบให้เป็นฟีเจอร์ตัวเลข
โหลดชุดข้อมูล
โหลดชุดข้อมูล German credit จาก OpenML โดยตรง คอลัมน์ class เก็บ label โดย good คือผู้สมัครที่ชำระสินเชื่อคืน และ bad คือผู้ที่ไม่ชำระ
df = fetch_openml(data_id=31, as_frame=True).frame
print(df.shape)
df.head()
(1000, 21)
checking_status  duration                  credit_history  \
0              <0         6  critical/other existing credit
1        0<=X<200        48                   existing paid
2     no checking        12  critical/other existing credit
3              <0        42                   existing paid
4              <0        24              delayed previously

               purpose  credit_amount    savings_status employment  \
0             radio/tv           1169  no known savings        >=7
1             radio/tv           5951              <100     1<=X<4
2            education           2096              <100     4<=X<7
3  furniture/equipment           7882              <100     4<=X<7
4              new car           4870              <100     1<=X<4

   installment_commitment     personal_status other_parties  ...  \
0                       4         male single          none  ...
1                       2  female div/dep/mar          none  ...
2                       2         male single          none  ...
3                       2         male single     guarantor  ...
4                       3         male single          none  ...

   property_magnitude age  other_payment_plans   housing existing_credits  \
0         real estate  67                 none       own                2
1         real estate  22                 none       own                1
2         real estate  49                 none       own                1
3      life insurance  45                 none  for free                1
4   no known property  53                 none  for free                2

                  job num_dependents  own_telephone foreign_worker class
0             skilled              1            yes            yes  good
1             skilled              1           none            yes   bad
2  unskilled resident              2           none            yes  good
3             skilled              2           none            yes  good
4             skilled              2           none            yes   bad

[5 rows x 21 columns]
เข้ารหัสฟีเจอร์
แปลง label เป็นค่าไบนารี และทำ one-hot encode กับคอลัมน์หมวดหมู่ 13 คอลัมน์ โค้ดจะทิ้งหมวดหมู่แรกของแต่ละคอลัมน์เพื่อหลีกเลี่ยงฟีเจอร์ซ้ำซ้อน ได้ฟีเจอร์ตัวเลข 48 ตัว
y = (df["class"] == "good").astype(int)

features = df.drop(columns="class")
categorical_cols = [
    col for col in features.columns if features[col].dtype.name == "category"
]
encoder = OneHotEncoder(
    sparse_output=False, handle_unknown="ignore", drop="first"
)
encoded = pd.DataFrame(
    encoder.fit_transform(features[categorical_cols]),
    columns=encoder.get_feature_names_out(categorical_cols),
    index=features.index,
)
x = pd.concat([features.drop(columns=categorical_cols), encoded], axis=1)
print(f"{x.shape[1]} features")
48 features
แบ่งเป็นชุดฝึกและชุดทดสอบ
กันผู้สมัคร 20% ไว้เป็นชุดทดสอบ การแบ่งแบบ stratified ทำให้สัดส่วนสินเชื่อดีและไม่ดีเท่ากันทั้งสองชุด
x_train, x_test, y_train, y_test = train_test_split(
    x, y, test_size=0.2, random_state=42, stratify=y
)
print(f"Training set: {x_train.shape}, test set: {x_test.shape}")
Training set: (800, 48), test set: (200, 48)
สร้าง baseline แบบคลาสสิก
ฝึก random forest บนฟีเจอร์คลาสสิก ในขั้นตอนที่ 4 คุณจะเปรียบเทียบฟีเจอร์ที่ผ่านการแปลงด้วยควอนตัมกับเมตริกของมัน
baseline = train_random_forest(
    x_train, y_train, n_estimators=500, max_depth=12
)
results = {"Classical": evaluate(baseline, x_test, y_test)}
pd.DataFrame(results).T
Accuracy       AUC  F1 score  Precision    Recall
Classical     0.765  0.781071  0.845902   0.781818  0.921429
อัปโหลดข้อมูลไปยัง Rimay
Rimay อ่านอินพุตจากไฟล์ CSV ที่คุณอัปโหลดให้ฟังก์ชัน ฟีเจอร์และ label แยกเป็นคนละไฟล์ คุณยังอัปโหลดชุดทดสอบด้วย เพื่อให้ Rimay แมปมันด้วยการแมปเดียวกับที่ fit บนชุดฝึก
x_train.to_csv("x_train.csv", index=False)
y_train.to_csv("y_train.csv", index=False)
x_test.to_csv("x_test.csv", index=False)

for file_name in ("x_train.csv", "y_train.csv", "x_test.csv"):
    catalog.file_upload(file_name, rimay)
ขั้นตอนที่ 2: ปรับปัญหาให้เหมาะกับการรันบนฮาร์ดแวร์ควอนตัม
Rimay สร้างและ transpile circuit สำหรับตัวประมวลผลที่คุณเลือก จึงไม่มี circuit ให้ปรับเองด้วยมือ ระบุจำนวน shot ต่อ circuit ภายใต้ข้อจำกัดต่อไปนี้
-
ทุกฟีเจอร์ต้องใช้ qubit หนึ่งตัว ดังนั้นตัวประมวลผลต้องมี qubit อย่างน้อยเท่าจำนวนฟีเจอร์ของชุดข้อมูล
-
Rimay รัน circuit หนึ่งตัวต่อแถว โดยรวมแถวฝึกและแถวทดสอบ งานหนึ่งขอได้มากที่สุด 10 ล้านครั้ง ดังนั้นจำนวนแถวคูณ
shotsต้องไม่เกินงบนี้
ตรวจสอบทั้งสองขีดจำกัดก่อนส่งงาน
งานต้องเสร็จภายใน 24 ชั่วโมงด้วย รวมเวลาที่ circuit รอในคิว มิฉะนั้นงานจะถูกหยุดโดยไม่มีผลลัพธ์
shots = 5000

n_rows = len(x_train) + len(x_test)
n_features = x_train.shape[1]
print(f"Qubits needed: {n_features} of {backend.num_qubits} available")
print(f"Executions: {n_rows * shots:,} of 10,000,000 allowed")
Qubits needed: 48 of 156 available
Executions: 5,000,000 of 10,000,000 allowed
คำนวณขนาดฟังก์ชัน
ทุกงานรันที่ขนาดฟังก์ชัน S, M หรือ L ซึ่งเลือกทรัพยากรประมวลผลที่งานใช้ สำหรับ Rimay ขนาดขึ้นอยู่กับจำนวนแถวที่งานแมป โดยรวมแถวฝึกและแถวทดสอบ ถ้าคุณขอขนาดที่เล็กเกินไป งานจะล้มเหลวด้วยข้อผิดพลาด 4600 สำหรับขนาดและขีดจำกัดของแต่ละขนาด ดู Function sizes ในคู่มือ Rimay
เซลล์ต่อไปนี้กำหนดตัวคำนวณขนาด มันรันบนเครื่องของคุณ อ่านเฉพาะข้อมูลที่คุณส่งให้ และไม่ส่งอะไรออกไป
from os import PathLike
from typing import Any, Literal, Sequence, Sized

Size = Literal["S", "M", "L"]

# Upper bounds (inclusive) in samples.
_SMALL = 2_999
_MEDIUM = 9_999

FIT_TRANSFORM, TRANSFORM, DELETE = "fit-transform", "transform", "delete"

# Which positions of input_file hold samples, per mode. The labels in
# y_train submit no circuits of their own, so they are not counted.
SAMPLE_POSITIONS = {FIT_TRANSFORM: (0, 2), TRANSFORM: (0,)}

def calculate_function_size(problem: Sequence[Sized], **kwargs: Any) -> Size:
    """Return the size ("S", "M" or "L") required to run the function."""
    metrics = _measure(problem, **kwargs)
    if _is_small(metrics):
        return "S"
    if _is_medium(metrics):
        return "M"
    return "L"

def _measure(problem: Sequence[Sized], **kwargs: Any) -> dict:
    """The samples the job submits."""
    return {"samples": count_samples(problem, kwargs.get("mode"))}

def count_samples(problem: Sequence[Sized], mode: Any) -> int:
    """Rows across the data sets of ``problem`` that carry samples."""
    if mode == DELETE:
        return 0
    if mode not in SAMPLE_POSITIONS:
        raise ValueError(f"cannot size mode {mode!r}")
    if _is_name(problem) or (
        isinstance(problem, (list, tuple))
        and any(_is_name(data) for data in problem)
    ):
        raise TypeError(
            "pass the data, not the file name: read each input_file, e.g. with "
            "pandas.read_csv, and pass the data sets in input_file order"
        )
    if not isinstance(problem, (list, tuple)):
        raise TypeError(
            "pass a list of data sets in input_file order, e.g. [x_train, y_train], "
            f"not a single {type(problem).__name__}"
        )
    return sum(
        len(problem[i]) for i in SAMPLE_POSITIONS[mode] if i < len(problem)
    )

def _is_name(value: Any) -> bool:
    """A file name or path rather than data."""
    return isinstance(value, (str, bytes, PathLike))

def _is_small(metrics: dict) -> bool:
    """Determine if the metrics fit T-size 'S'."""
    return metrics["samples"] <= _SMALL

def _is_medium(metrics: dict) -> bool:
    """Determine if the metrics fit T-size 'M'."""
    return metrics["samples"] <= _MEDIUM
ส่งชุดข้อมูลตามลำดับเดียวกับไฟล์ใน input_file พร้อมโหมดของการรัน
size = calculate_function_size(
    [x_train, y_train, x_test], mode="fit-transform"
)
print(size)
S
ขั้นตอนที่ 3: รันโดยใช้ Qiskit primitives
รัน Rimay ในโหมด fit-transform มันจะ fit การแมปฟีเจอร์ควอนตัมบน x_train.csv และ y_train.csv และแมปทั้งชุดฝึกและชุดทดสอบด้วยการแมปนั้น ลำดับของไฟล์ใน input_file สำคัญ ให้ใส่ฟีเจอร์ชุดฝึก label ชุดฝึก แล้วจึงฟีเจอร์ชุดทดสอบ (ไม่บังคับ) ส่งขนาดที่คุณคำนวณไว้เป็น function_size
job = rimay.run(
    mode="fit-transform",
    input_file=[
        "x_train.csv",
        "y_train.csv",
        "x_test.csv",
    ],  # This order matters
    backend_name=backend.name,
    shots=shots,
    function_size=size,
)
print(job.job_id)
de5094df-bb17-4924-9605-d6196a4aa999
ติดตามงาน
ตรวจสอบสถานะของงานขณะรัน job.result() จะบล็อกจนกว่างานจะเสร็จ
print(job.status())
INITIALIZING
result = job.result()
print(result["output_files"])
['de5094df-bb17-4924-9605-d6196a4aa999_xq_train.csv', 'de5094df-bb17-4924-9605-d6196a4aa999_xq_test.csv']
ผลลัพธ์มี mapping_id ซึ่งระบุการแมปที่การรันนี้ fit ไว้ คุณไม่ต้องใช้มันในบทเรียนนี้ เพราะชุดทดสอบถูกแมปในการรันเดียวกันแล้ว บันทึก ID นี้ไว้ถ้าคุณต้องการแมปแถวใหม่ภายหลังด้วย mode="transform" มันเป็นทางเดียวที่จะเข้าถึงการแมปที่ fit ไว้ และถ้าไม่มี คุณต้อง fit ใหม่และจ่ายเงินอีกครั้ง การแมปถูกสร้างตามผัง qubit ของตัวประมวลผลนี้ ดังนั้นการรัน transform ภายหลังต้องส่ง backend_name เดียวกัน
mapping_id = result["mapping_id"]
ขั้นตอนที่ 4: ประมวลผลหลังการรันและส่งคืนผลลัพธ์ในรูปแบบคลาสสิกที่ต้องการ
ดาวน์โหลดฟีเจอร์ที่ผ่านการแปลงด้วยควอนตัม
ดาวน์โหลดไฟล์ที่งานเขียนไว้ โดยใช้ชื่อใน output_files แต่ละชื่อขึ้นต้นด้วย job ID ดังนั้นไฟล์ของการรันนี้จะยังอยู่หลังการรันครั้งต่อ ๆ ไป ส่ง target_name เพื่อให้แต่ละไฟล์ถูกบันทึกด้วยชื่อของมันเอง
train_file, test_file = result["output_files"]
for file_name in (train_file, test_file):
    catalog.file_download(file_name, rimay, target_name=file_name)

xq_train = pd.read_csv(train_file).to_numpy()
xq_test = pd.read_csv(test_file).to_numpy()
print(f"Quantum-transformed features: {xq_train.shape[1]}")
586kiB [00:00, 1.13MiB/s]
147kiB [00:00, 336kiB/s]
Quantum-transformed features: 99
ฝึกบนฟีเจอร์ที่ผ่านการแปลงด้วยควอนตัม
ฝึก random forest บนฟีเจอร์ที่ผ่านการแปลงด้วยควอนตัมอย่างเดียว
quantum = train_random_forest(
    xq_train, y_train, n_estimators=900, max_depth=15
)
results["Quantum"] = evaluate(quantum, xq_test, y_test)
ฝึกบนฟีเจอร์คลาสสิกและควอนตัมรวมกัน
นำฟีเจอร์ดั้งเดิมและฟีเจอร์ที่ผ่านการแปลงด้วยควอนตัมมาต่อกัน แล้วฝึกโมเดลเดียวกันบนชุดรวม
xh_train = np.hstack([x_train.to_numpy(), xq_train])
xh_test = np.hstack([x_test.to_numpy(), xq_test])

hybrid = train_random_forest(
    xh_train, y_train, n_estimators=900, max_depth=15
)
results["Hybrid"] = evaluate(hybrid, xh_test, y_test)
เปรียบเทียบผลลัพธ์
เปรียบเทียบสามโมเดลบนชุดทดสอบ
comparison = pd.DataFrame(results).T
print(comparison.round(3))

comparison[["Accuracy", "AUC", "F1 score"]].T.plot.bar(rot=0, figsize=(8, 4))
plt.ylim(0.5, 1.0)
plt.ylabel("Score on the test set")
plt.title("Random forest on classical, quantum, and hybrid features")
plt.show()
Accuracy    AUC  F1 score  Precision  Recall
Classical     0.765  0.781     0.846      0.782   0.921
Quantum       0.730  0.784     0.827      0.750   0.921
Hybrid        0.730  0.791     0.825      0.756   0.907

AUC วัดว่าโมเดลจัดอันดับสินเชื่อดีสูงกว่าสินเชื่อไม่ดีได้ดีแค่ไหน โดยไม่ขึ้นกับ threshold ในการตัดสินใจ จึงเป็นเมตริกที่ให้ข้อมูลมากที่สุดบนชุดข้อมูลที่ไม่สมดุลนี้ (สินเชื่อดี 70%) ในการทดสอบ benchmark ของ Kipu Quantum ฟีเจอร์ที่ผ่านการแปลงด้วยควอนตัมอย่างเดียวได้ AUC ใกล้เคียงกับ baseline แบบคลาสสิก และโมเดล hybrid ที่รวมทั้งสองอย่างได้ AUC และคะแนน F1 สูงที่สุด ดังนั้นฟีเจอร์ที่ผ่านการแปลงด้วยควอนตัมจึงเพิ่มข้อมูลที่ฟีเจอร์คลาสสิกให้ไม่ได้เพียงลำพัง
ล้างข้อมูล (ไม่บังคับ)
การแมปที่ fit ไว้จะคงอยู่จนกว่าคุณจะลบ ถ้าคุณไม่ต้องการแมปข้อมูลเพิ่มด้วยมัน ให้ลบทิ้ง การลบไม่ใช้งานควอนตัม ไม่ใช้เวลา QPU และย้อนกลับไม่ได้
# rimay.run(mode="delete", mapping_id=mapping_id).result()
{'output_files': [],
 'mode': 'delete',
 'deleted': True,
 'mapping_id': 'eUCy4EnZM7G9jYo5b2Pu-TuCXK7zX_wPTT67g9J1dVE',
 'metadata': {'version': '0.6.0', 'resource_usage': {}}}
สรุป
สิ่งที่คุณทำสำเร็จ
ในบทเรียนนี้ คุณทำสิ่งต่อไปนี้สำเร็จ
-
เตรียมชุดข้อมูลความเสี่ยงสินเชื่อจากโลกจริงที่มีคุณลักษณะแบบหมวดหมู่และตัวเลข สำหรับ quantum feature extraction
-
สร้าง baseline random forest แบบคลาสสิก
-
ใช้ Rimay fit การแมปฟีเจอร์ควอนตัมบนฮาร์ดแวร์ควอนตัม และแมปชุดฝึกและชุดทดสอบในการรันเดียว
-
ฝึกโมเดลเดียวกันบนฟีเจอร์ที่ผ่านการแปลงด้วยควอนตัมและบนฟีเจอร์รวม แล้วเปรียบเทียบกับ baseline
ประเด็นสำคัญ
-
Rimay เข้ากับ machine learning pipeline ที่มีอยู่ได้ในฐานะขั้นตอน preprocessing เพิ่มเติมหนึ่งขั้น คุณยังคงการเตรียมข้อมูลและโมเดลคลาสสิกของคุณไว้
-
จำนวน qubit เป็นตัวจำกัดจำนวนฟีเจอร์อินพุต และจำนวนแถวคูณ
shotsเป็นตัวจำกัดขนาดของงานหนึ่งงาน -
ใช้ฟีเจอร์ที่ผ่านการแปลงด้วยควอนตัมรวมกับฟีเจอร์ดั้งเดิมเป็นค่าเริ่มต้น เพราะโมเดลใช้ได้ทั้งสองอย่าง
ขั้นตอนถัดไป
- อ่านคู่มือ Rimay เพื่อเรียนรู้อินพุตทั้งหมด แมปข้อมูลใหม่ด้วย
mode="transform"และดู benchmark เพิ่มเติม - อ่านว่า quantum feature extraction ถูกนำไปใช้กับการจำแนกภาพดาวเทียมอย่างไร [3]
เอกสารอ้างอิง
[1] Simen, A., et al. (2025). Digitized Counterdiabatic Quantum Feature Extraction. arXiv preprint arXiv:2510.13807.
[2] Hofmann, H. (1994). Statlog (German Credit Data). OpenML dataset 31.
[3] Zhang, Q., et al. (2026). Quantum-enhanced satellite image classification. arXiv preprint arXiv:2602.18350.